No edit summary |
No edit summary |
||
| Line 14: | Line 14: | ||
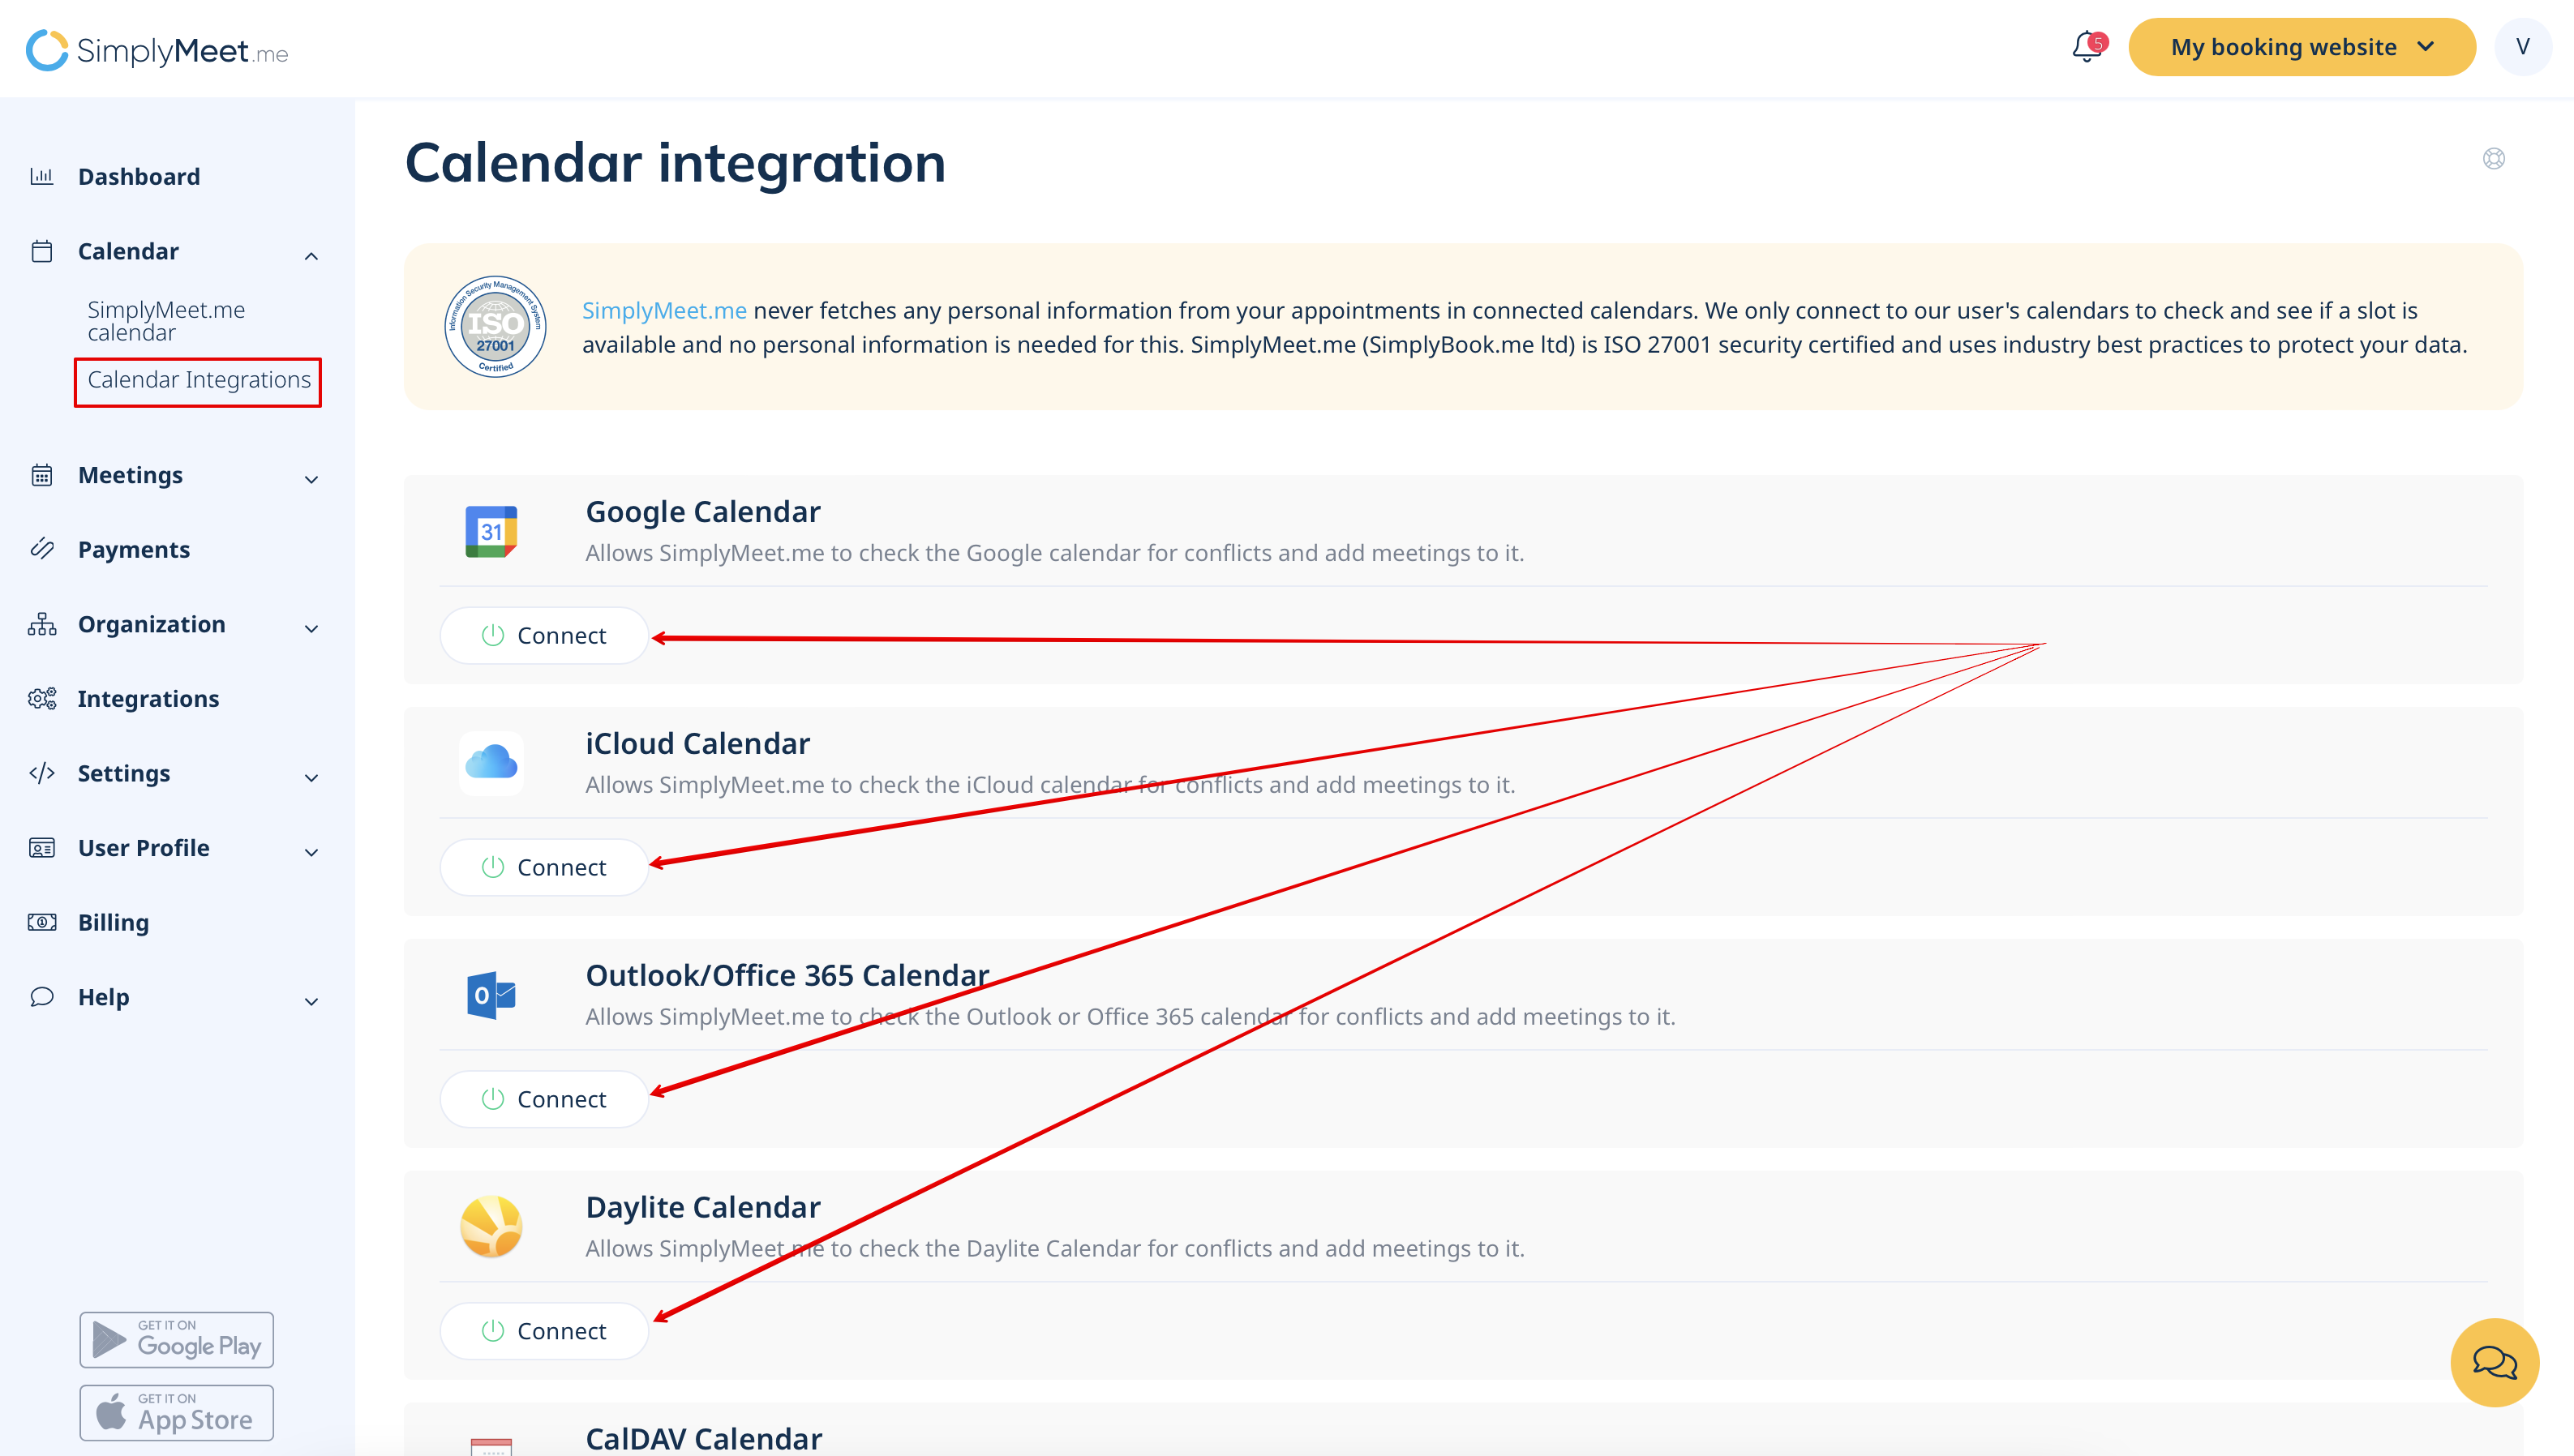
1. Navigate to '''Calendar Integrations''' in your SimplyMeet.me account.<br> | 1. Navigate to '''Calendar Integrations''' in your SimplyMeet.me account.<br> | ||
2. Click the '''Add Calendar Account''' button to connect external calendars such as Google, Outlook, or others. | 2. Click the '''Add Calendar Account''' button to connect external calendars such as Google, Outlook, or others. | ||
[[File:Sm connect external calendar list new step2.png|1200px|center|link=https://help.simplymeet.me/images/2/28/Sm_connect_external_calendar_list_new_step2.png]] | |||
<br><br> | <br><br> | ||
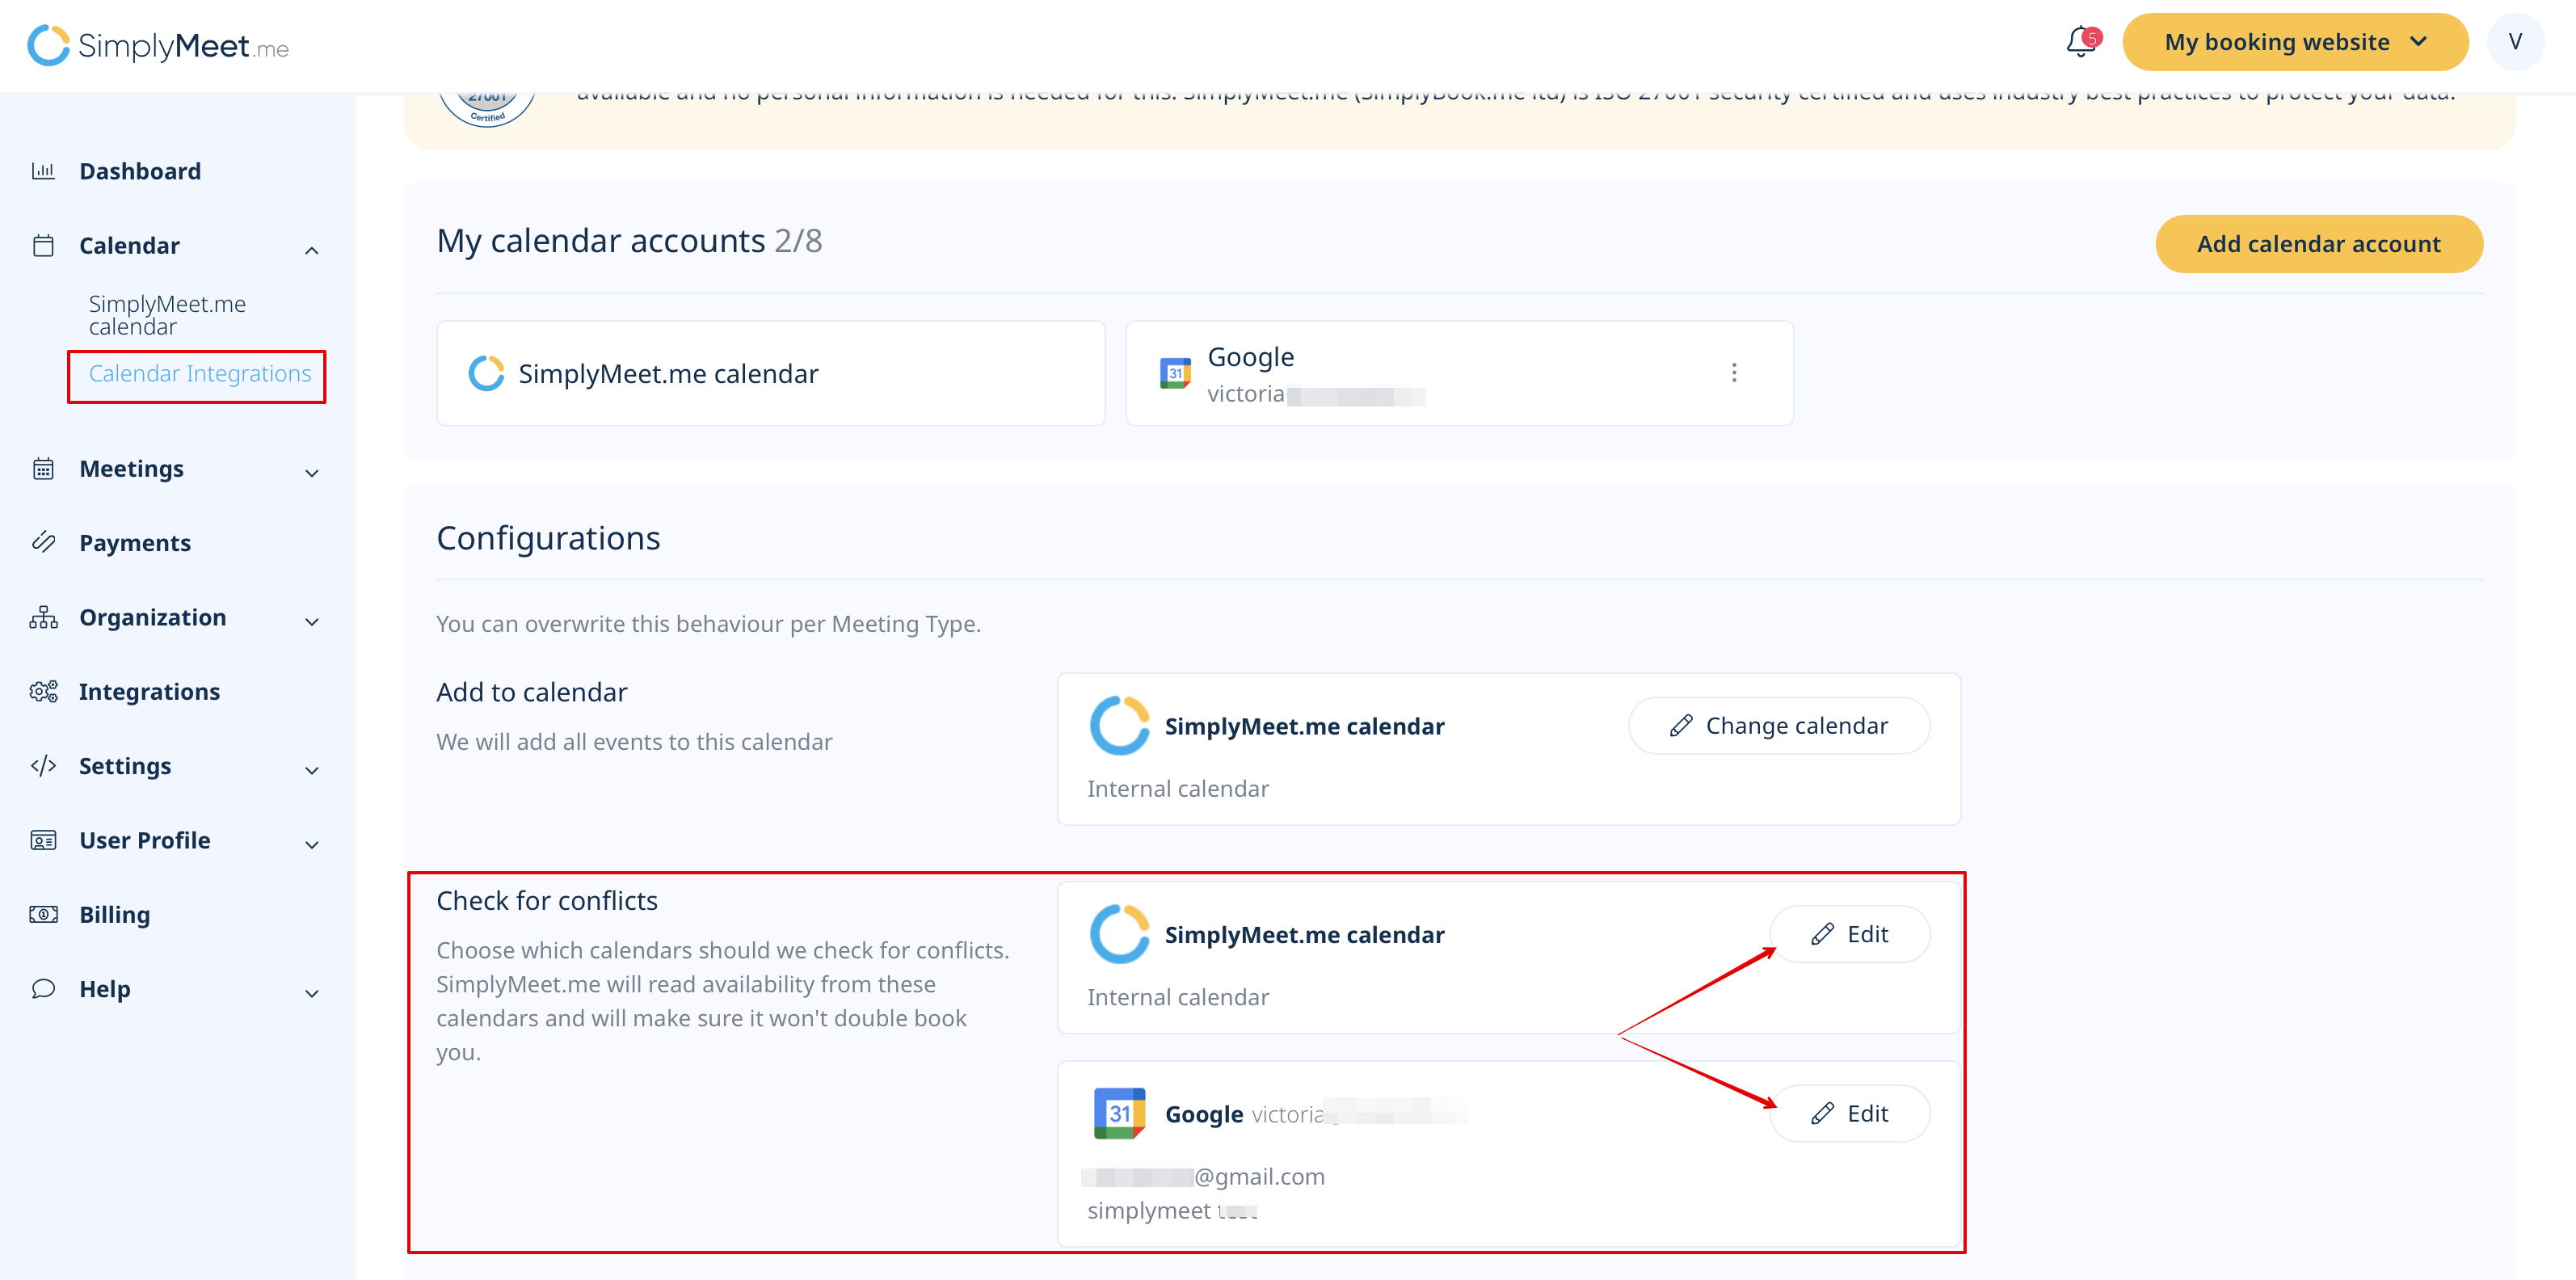
'''Step 2: Configure Conflict Checks''' | '''Step 2: Configure Conflict Checks''' | ||
1. Under '''Configurations''', select the '''Check for Conflicts''' option to identify which of your external calendars should be considered for conflict checking. | 1. Under '''Configurations''', select the '''Check for Conflicts''' option to identify which of your external calendars should be considered for conflict checking. | ||
[[File:Sm check calendars for conflicts new.png|1200px|center|link=https://help.simplymeet.me/images/1/1e/Sm_check_calendars_for_conflicts_new.png]] | |||
<br><br> | <br><br> | ||
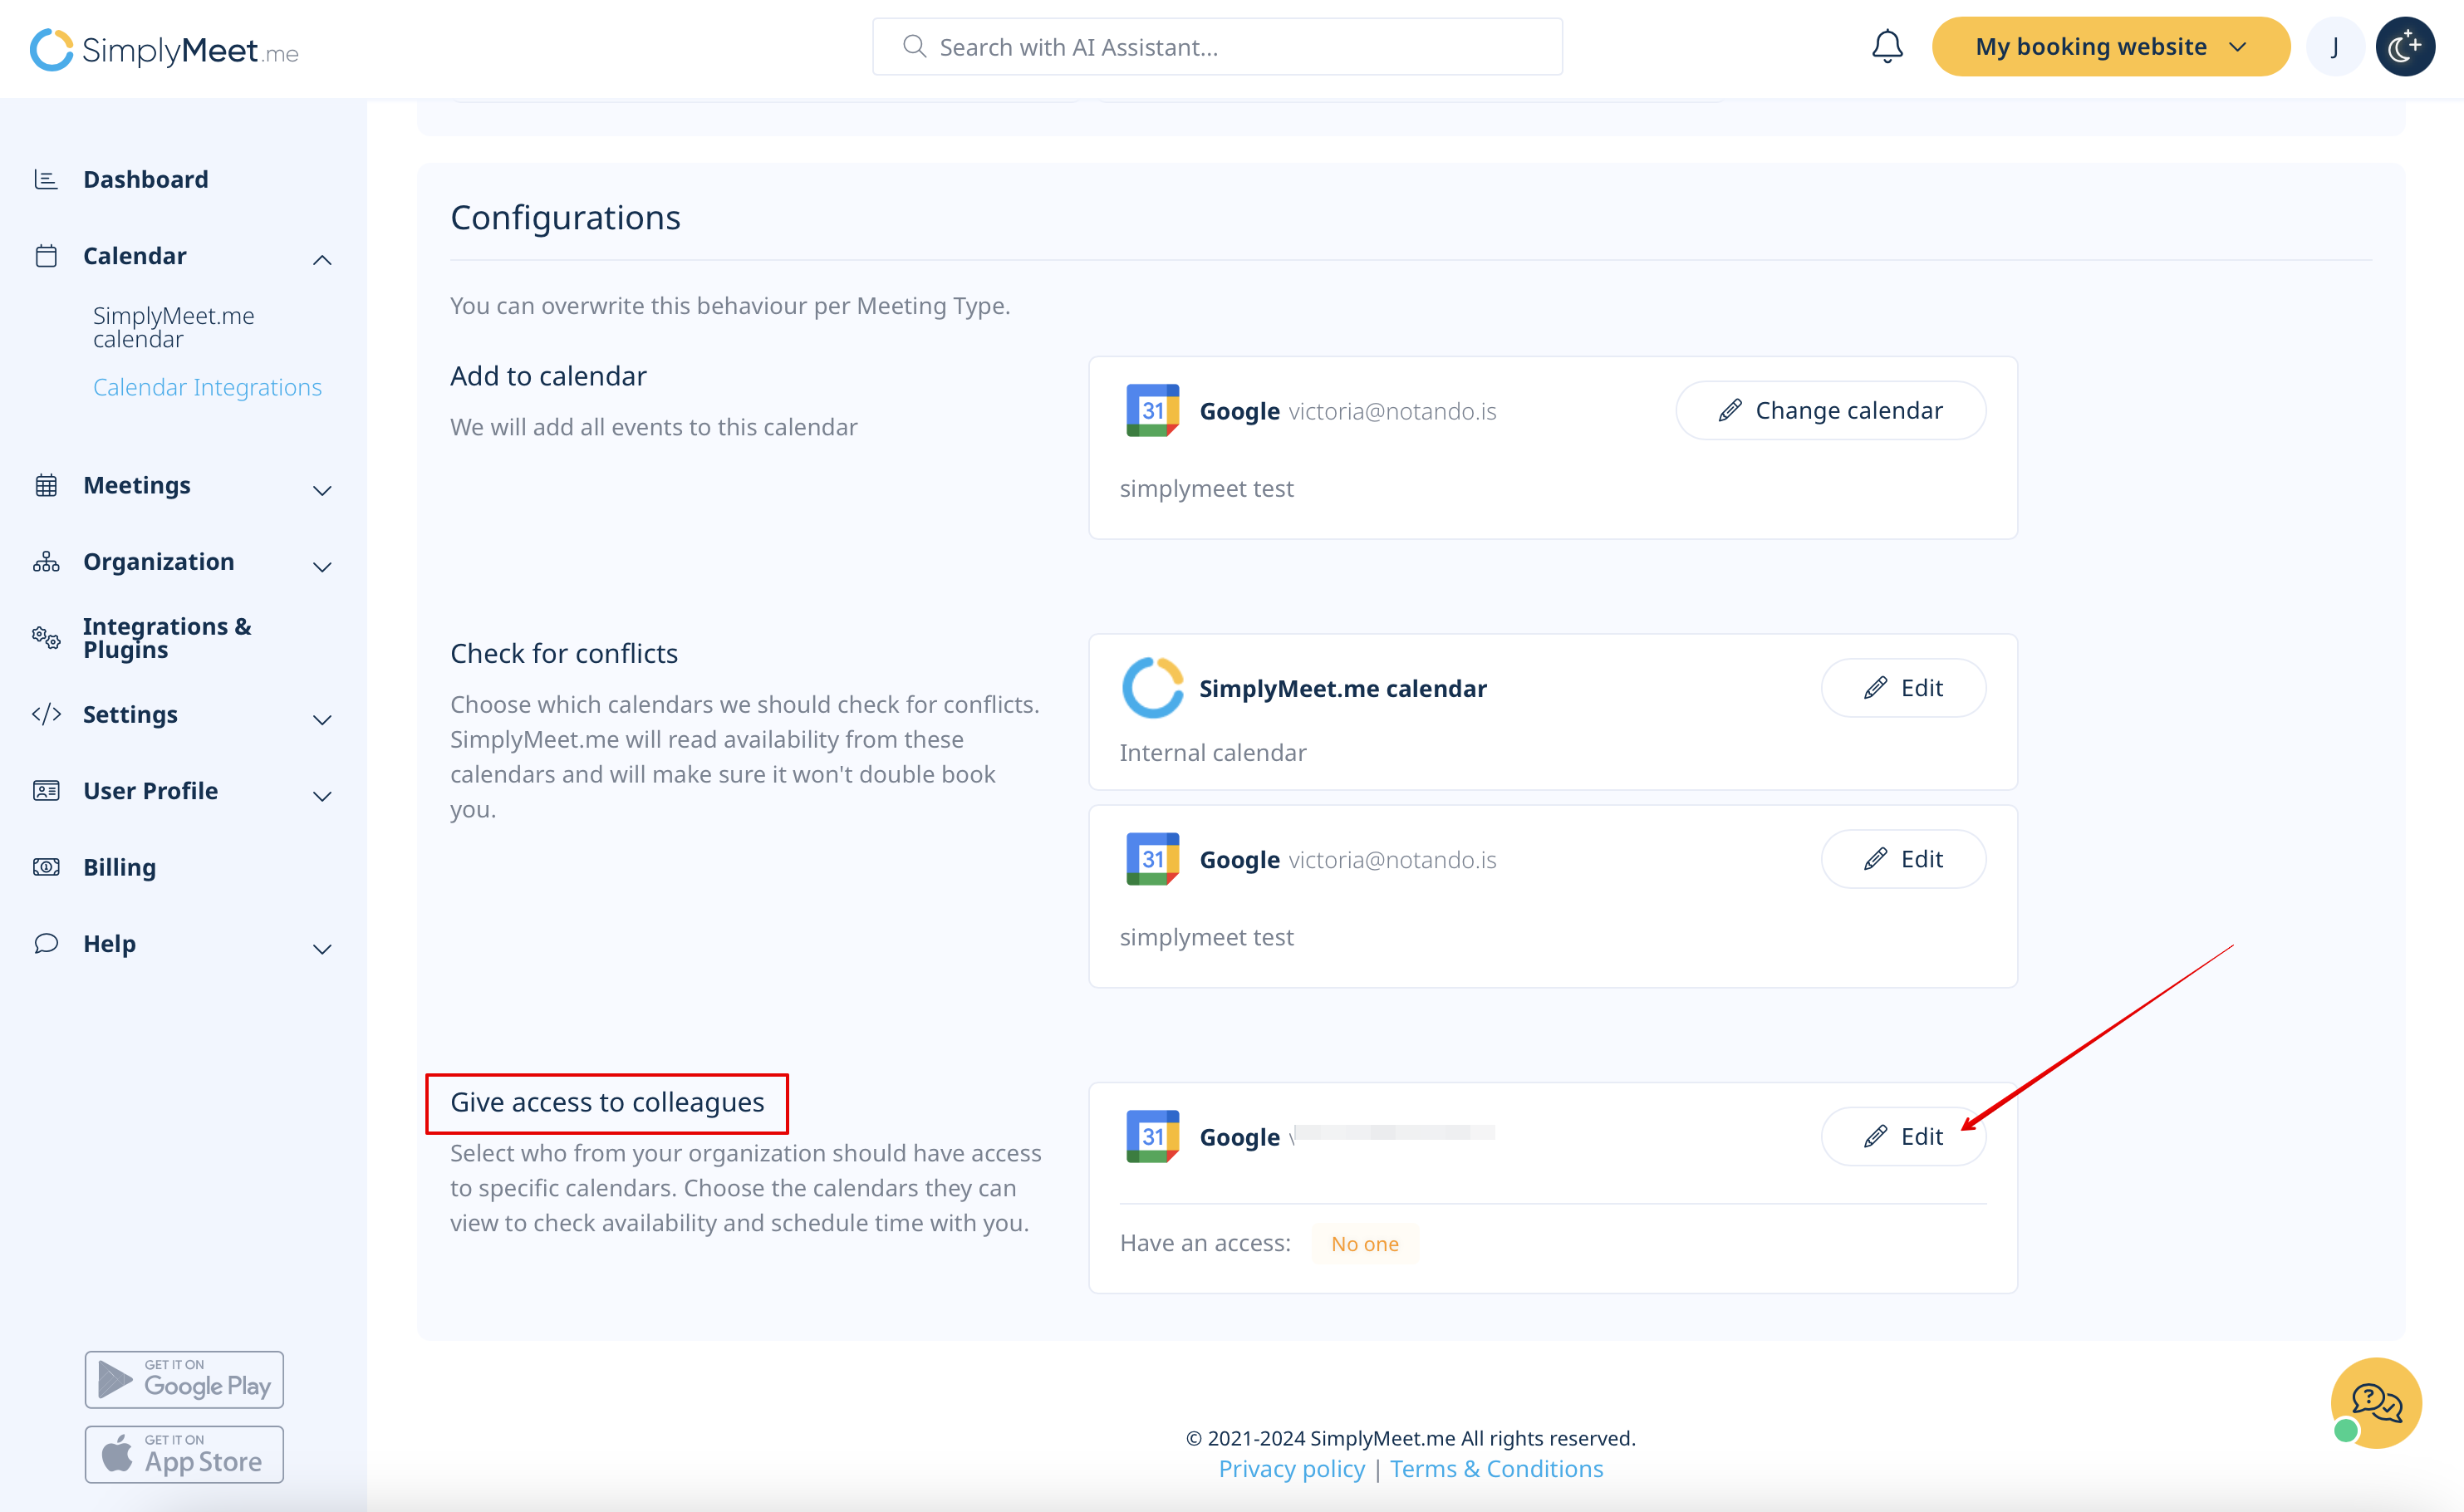
'''Step 3: Manage Calendar Sharing Permissions''' | '''Step 3: Manage Calendar Sharing Permissions''' | ||
Scroll to the '''Give Access to Colleagues''' section to manage sharing settings: | Scroll to the '''Give Access to Colleagues''' section to manage sharing settings: | ||
[[File:Sm give access to colleagues path.png|1200px|center|link=https://help.simplymeet.me/images/9/93/Sm_give_access_to_colleagues_path.png]] | |||
<br><br> | |||
* '''Choose shared calendars:''' Select which external calendars to share with your organization.<br> | * '''Choose shared calendars:''' Select which external calendars to share with your organization.<br> | ||
[[File:Sm select calendar for access.png|1200px|center|link= | |||
https://help.simplymeet.me/images/6/6b/Sm_select_calendar_for_access.png]] | |||
* '''Set user access levels:''' Assign visibility based on user tiers:<br> | * '''Set user access levels:''' Assign visibility based on user tiers:<br> | ||
<ul> | <ul> | ||
| Line 30: | Line 35: | ||
::<li>'''No one:''' Shared calendars remain private and inaccessible to other users.</li> | ::<li>'''No one:''' Shared calendars remain private and inaccessible to other users.</li> | ||
</ul> | </ul> | ||
[[File:Sm give access to option.png|1200px|center|link=https://help.simplymeet.me/images/d/d0/Sm_give_access_to_option.png]] | |||
<br><br> | <br><br> | ||
'''Step 4: Use the Users Calendar View''' | '''Step 4: Use the Users Calendar View''' | ||
| Line 36: | Line 42: | ||
2. Apply filters to focus on specific team members’ schedules.<br> | 2. Apply filters to focus on specific team members’ schedules.<br> | ||
3. Identify a suitable time slot by reviewing color-coded availability indicators. | 3. Identify a suitable time slot by reviewing color-coded availability indicators. | ||
[[File:Sm users view in calendar.png|1200px|center|link=https://help.simplymeet.me/images/0/00/Sm_users_view_in_calendar.png]] | |||
<br><br> | <br><br> | ||
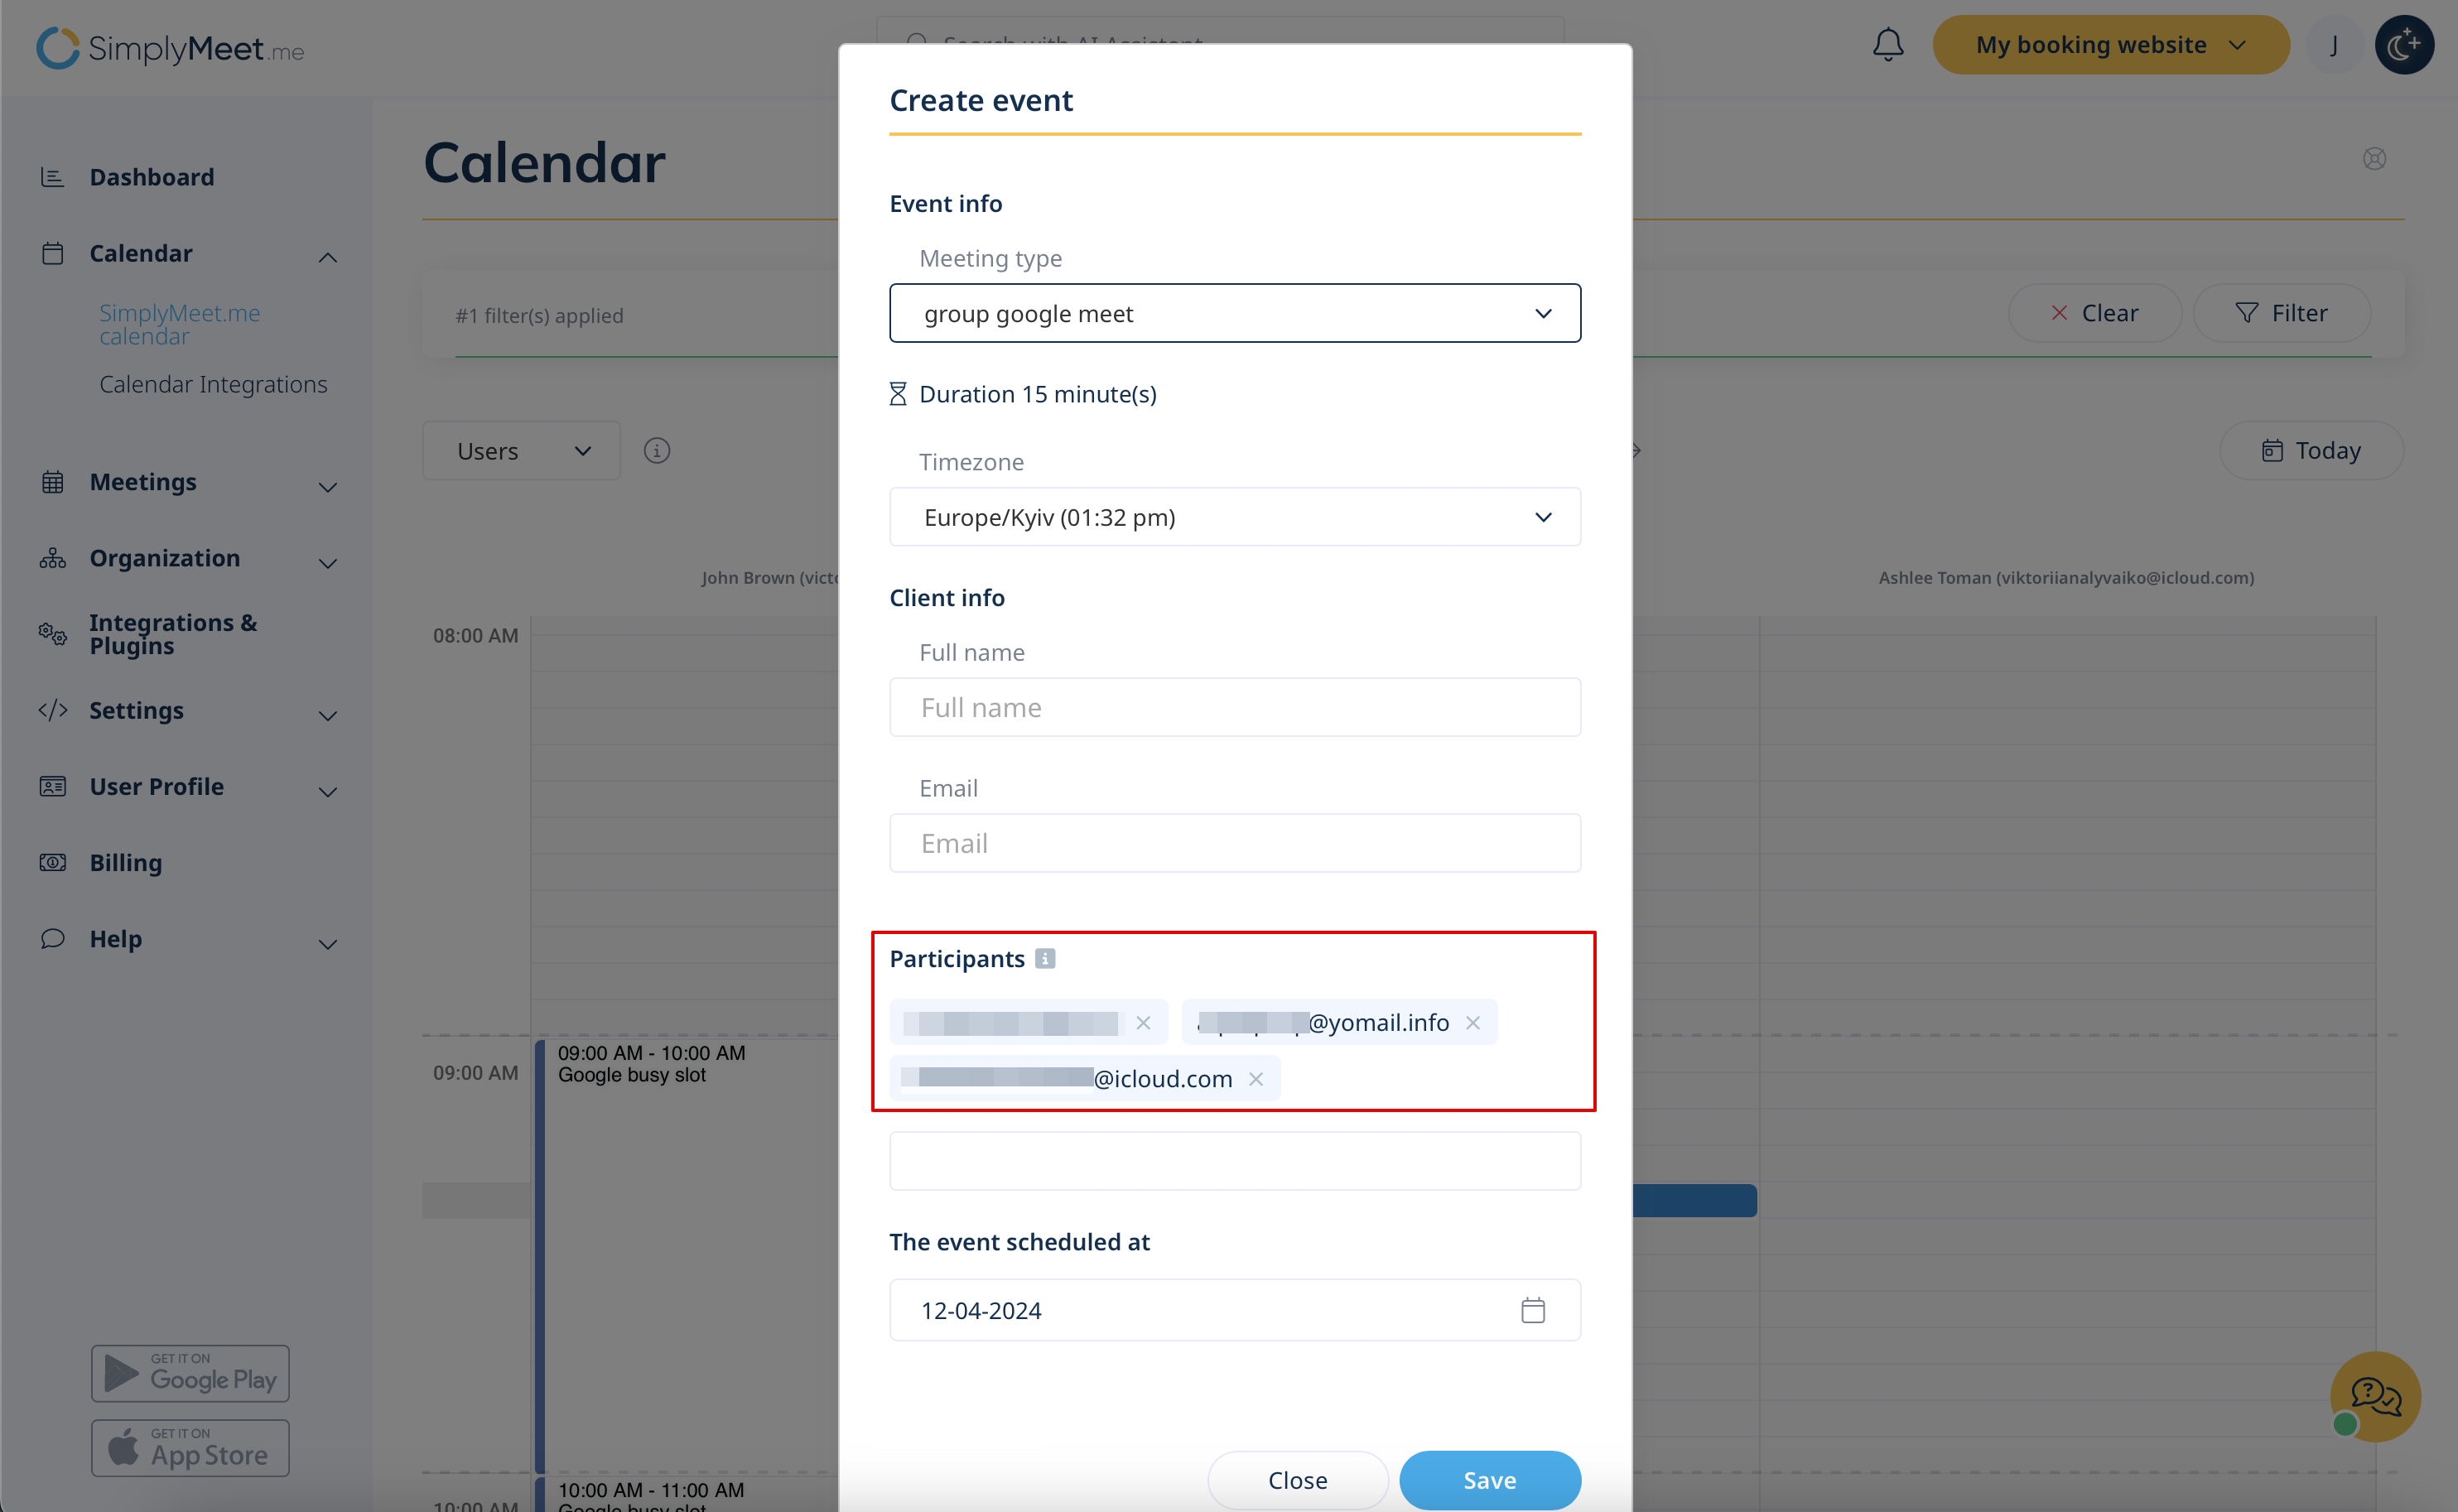
'''Step 5: Schedule a Meeting''' | '''Step 5: Schedule a Meeting''' | ||
| Line 42: | Line 49: | ||
2. The system will auto-add the filtered team members as participants.<br> | 2. The system will auto-add the filtered team members as participants.<br> | ||
3. Complete the meeting details, and confirm the appointment. | 3. Complete the meeting details, and confirm the appointment. | ||
[[File:Sm users view participants added to new meeting.png|1200px|center|link=https://help.simplymeet.me/images/d/d5/Sm_users_view_participants_added_to_new_meeting.png]] | |||
<br><br> | <br><br> | ||
Revision as of 12:09, 4 December 2024
The Team Scheduling feature in SimplyMeet.me allows meeting organizers to efficiently schedule meetings with multiple employees in their organization. By using the internal calendar view, organizers can check the availability of team members and easily create meetings during suitable times.
Event Visibility:
- Accessible only for paid plan users.
- Supports Google, Outlook, and other calendar types.
- Displays only "busy" events for all calendars except Outlook, which shows events with all statuses.
- Available only via the “Users” Calendar View.
- Events are color-coded for quick identification.
- External events can be clicked to view details in a popup but cannot be edited or removed.
How to Use Team Scheduling
Step 1: Set Up Calendar Integrations
1. Navigate to Calendar Integrations in your SimplyMeet.me account.
2. Click the Add Calendar Account button to connect external calendars such as Google, Outlook, or others.
Step 2: Configure Conflict Checks
1. Under Configurations, select the Check for Conflicts option to identify which of your external calendars should be considered for conflict checking.
Step 3: Manage Calendar Sharing Permissions
Scroll to the Give Access to Colleagues section to manage sharing settings:
- Choose shared calendars: Select which external calendars to share with your organization.

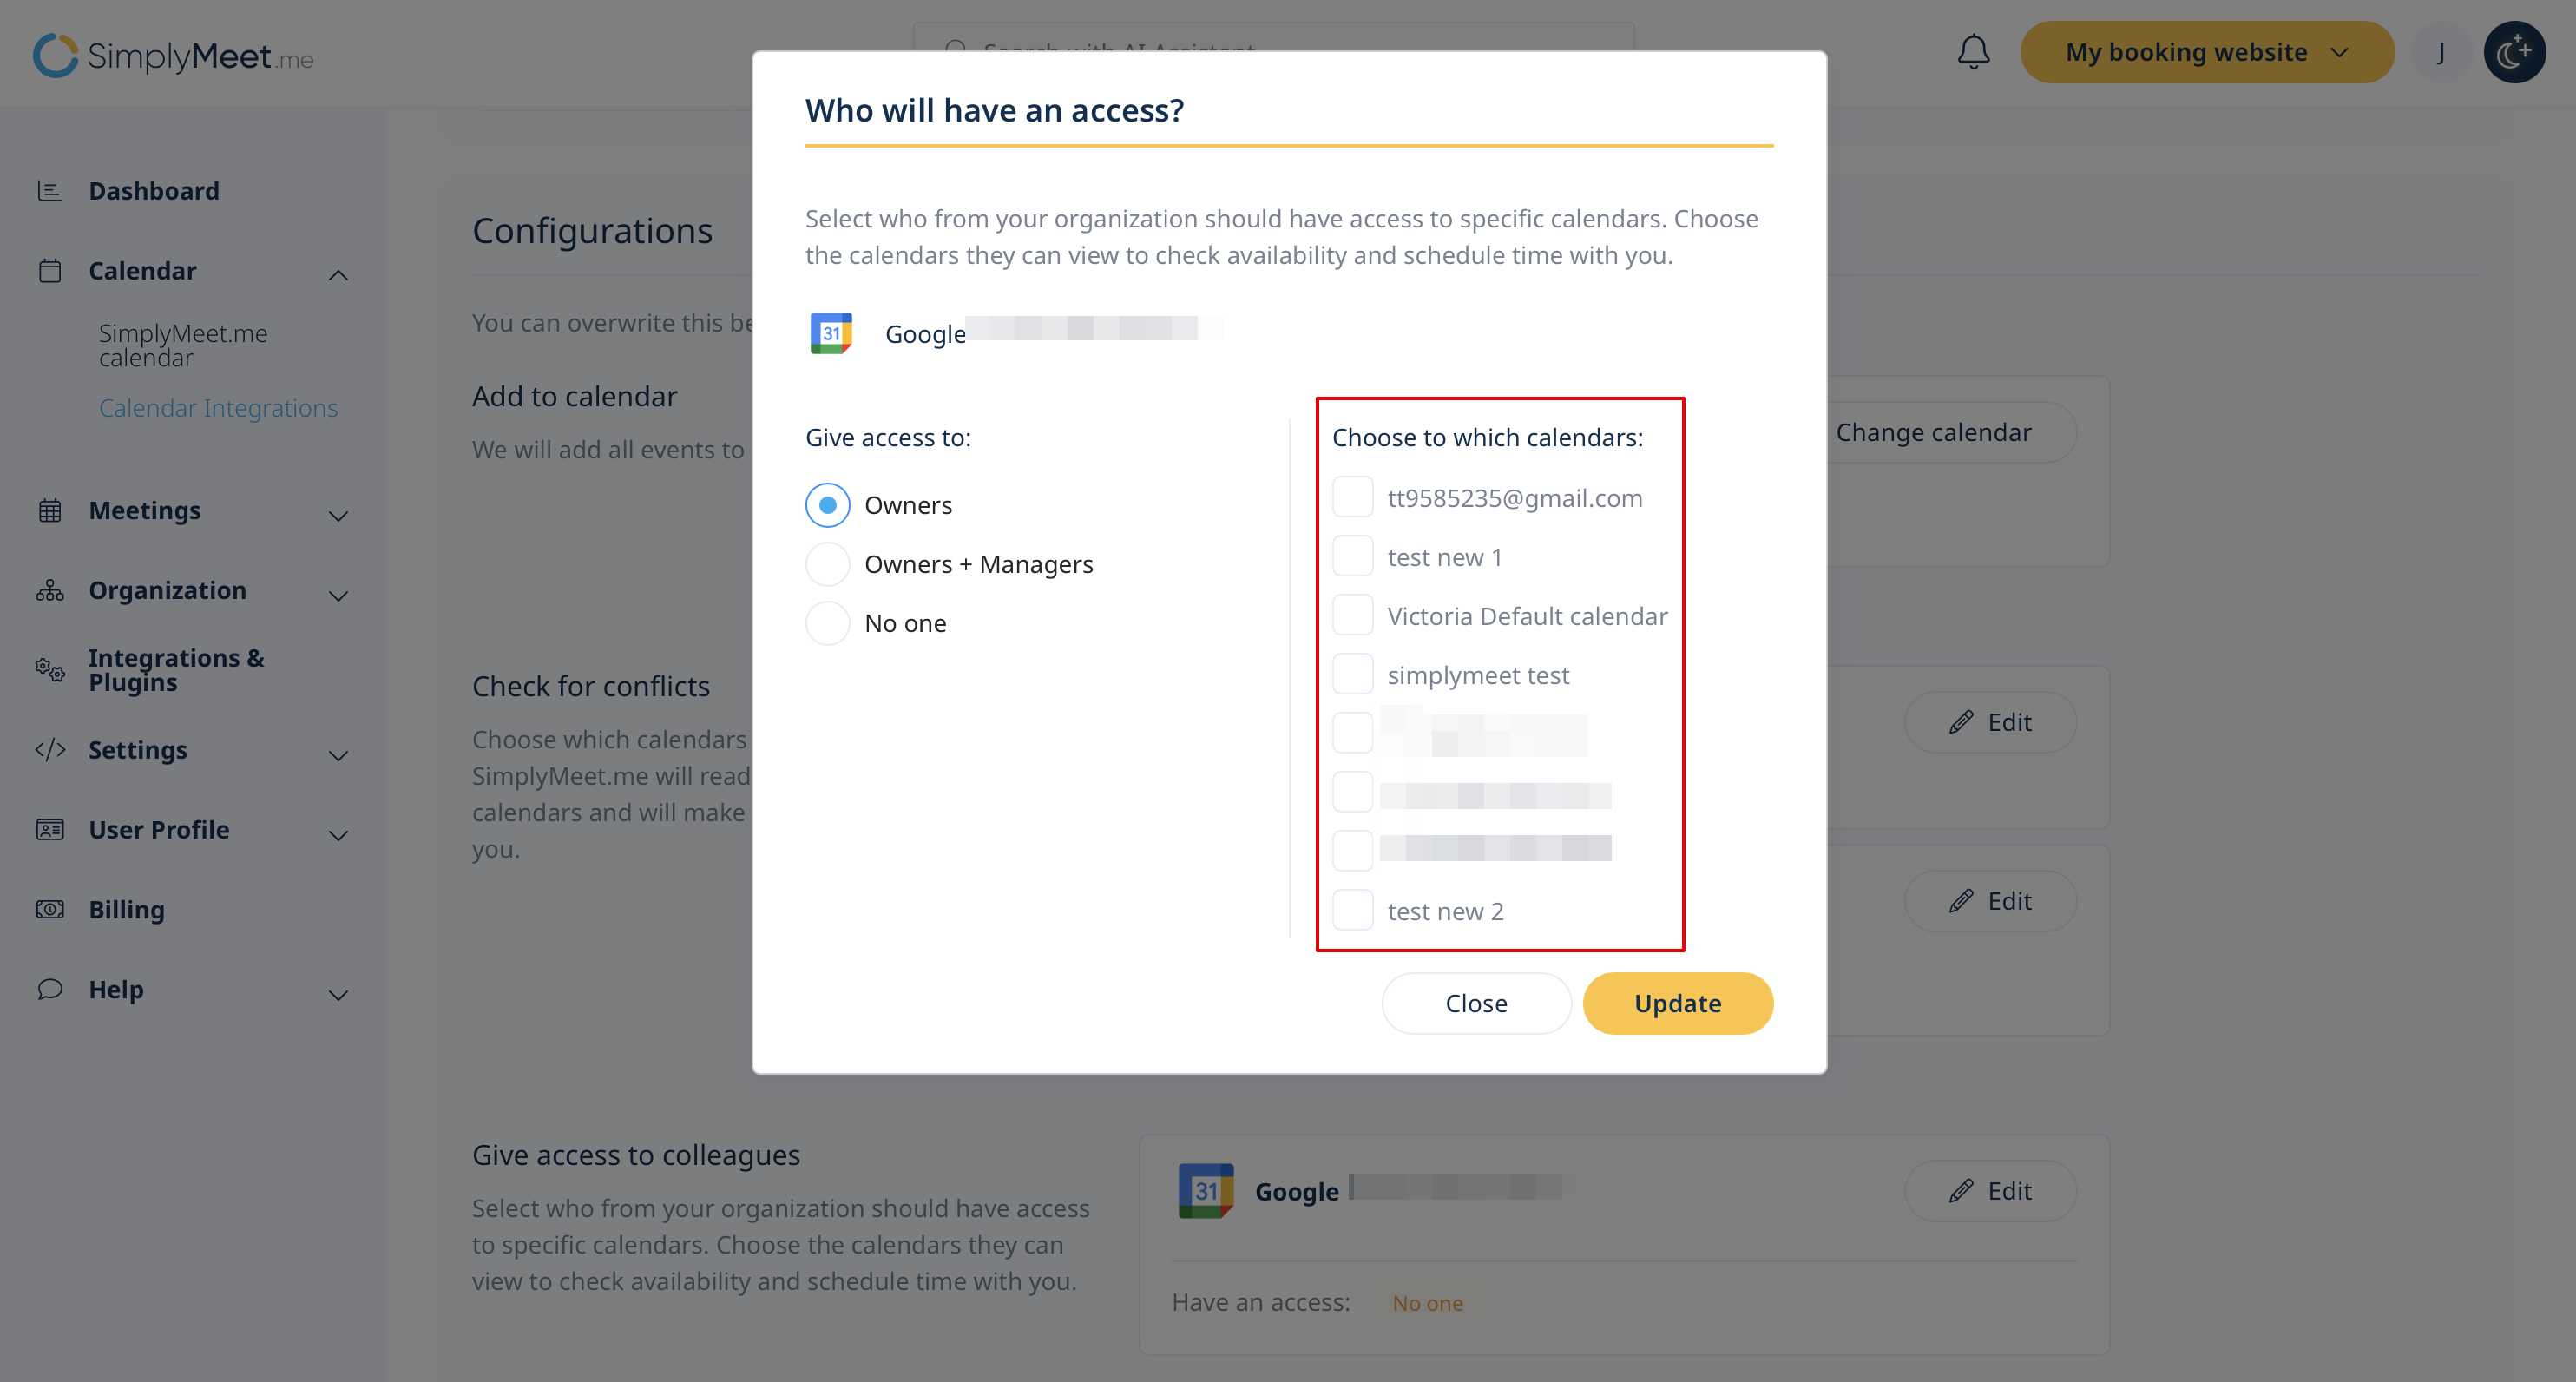
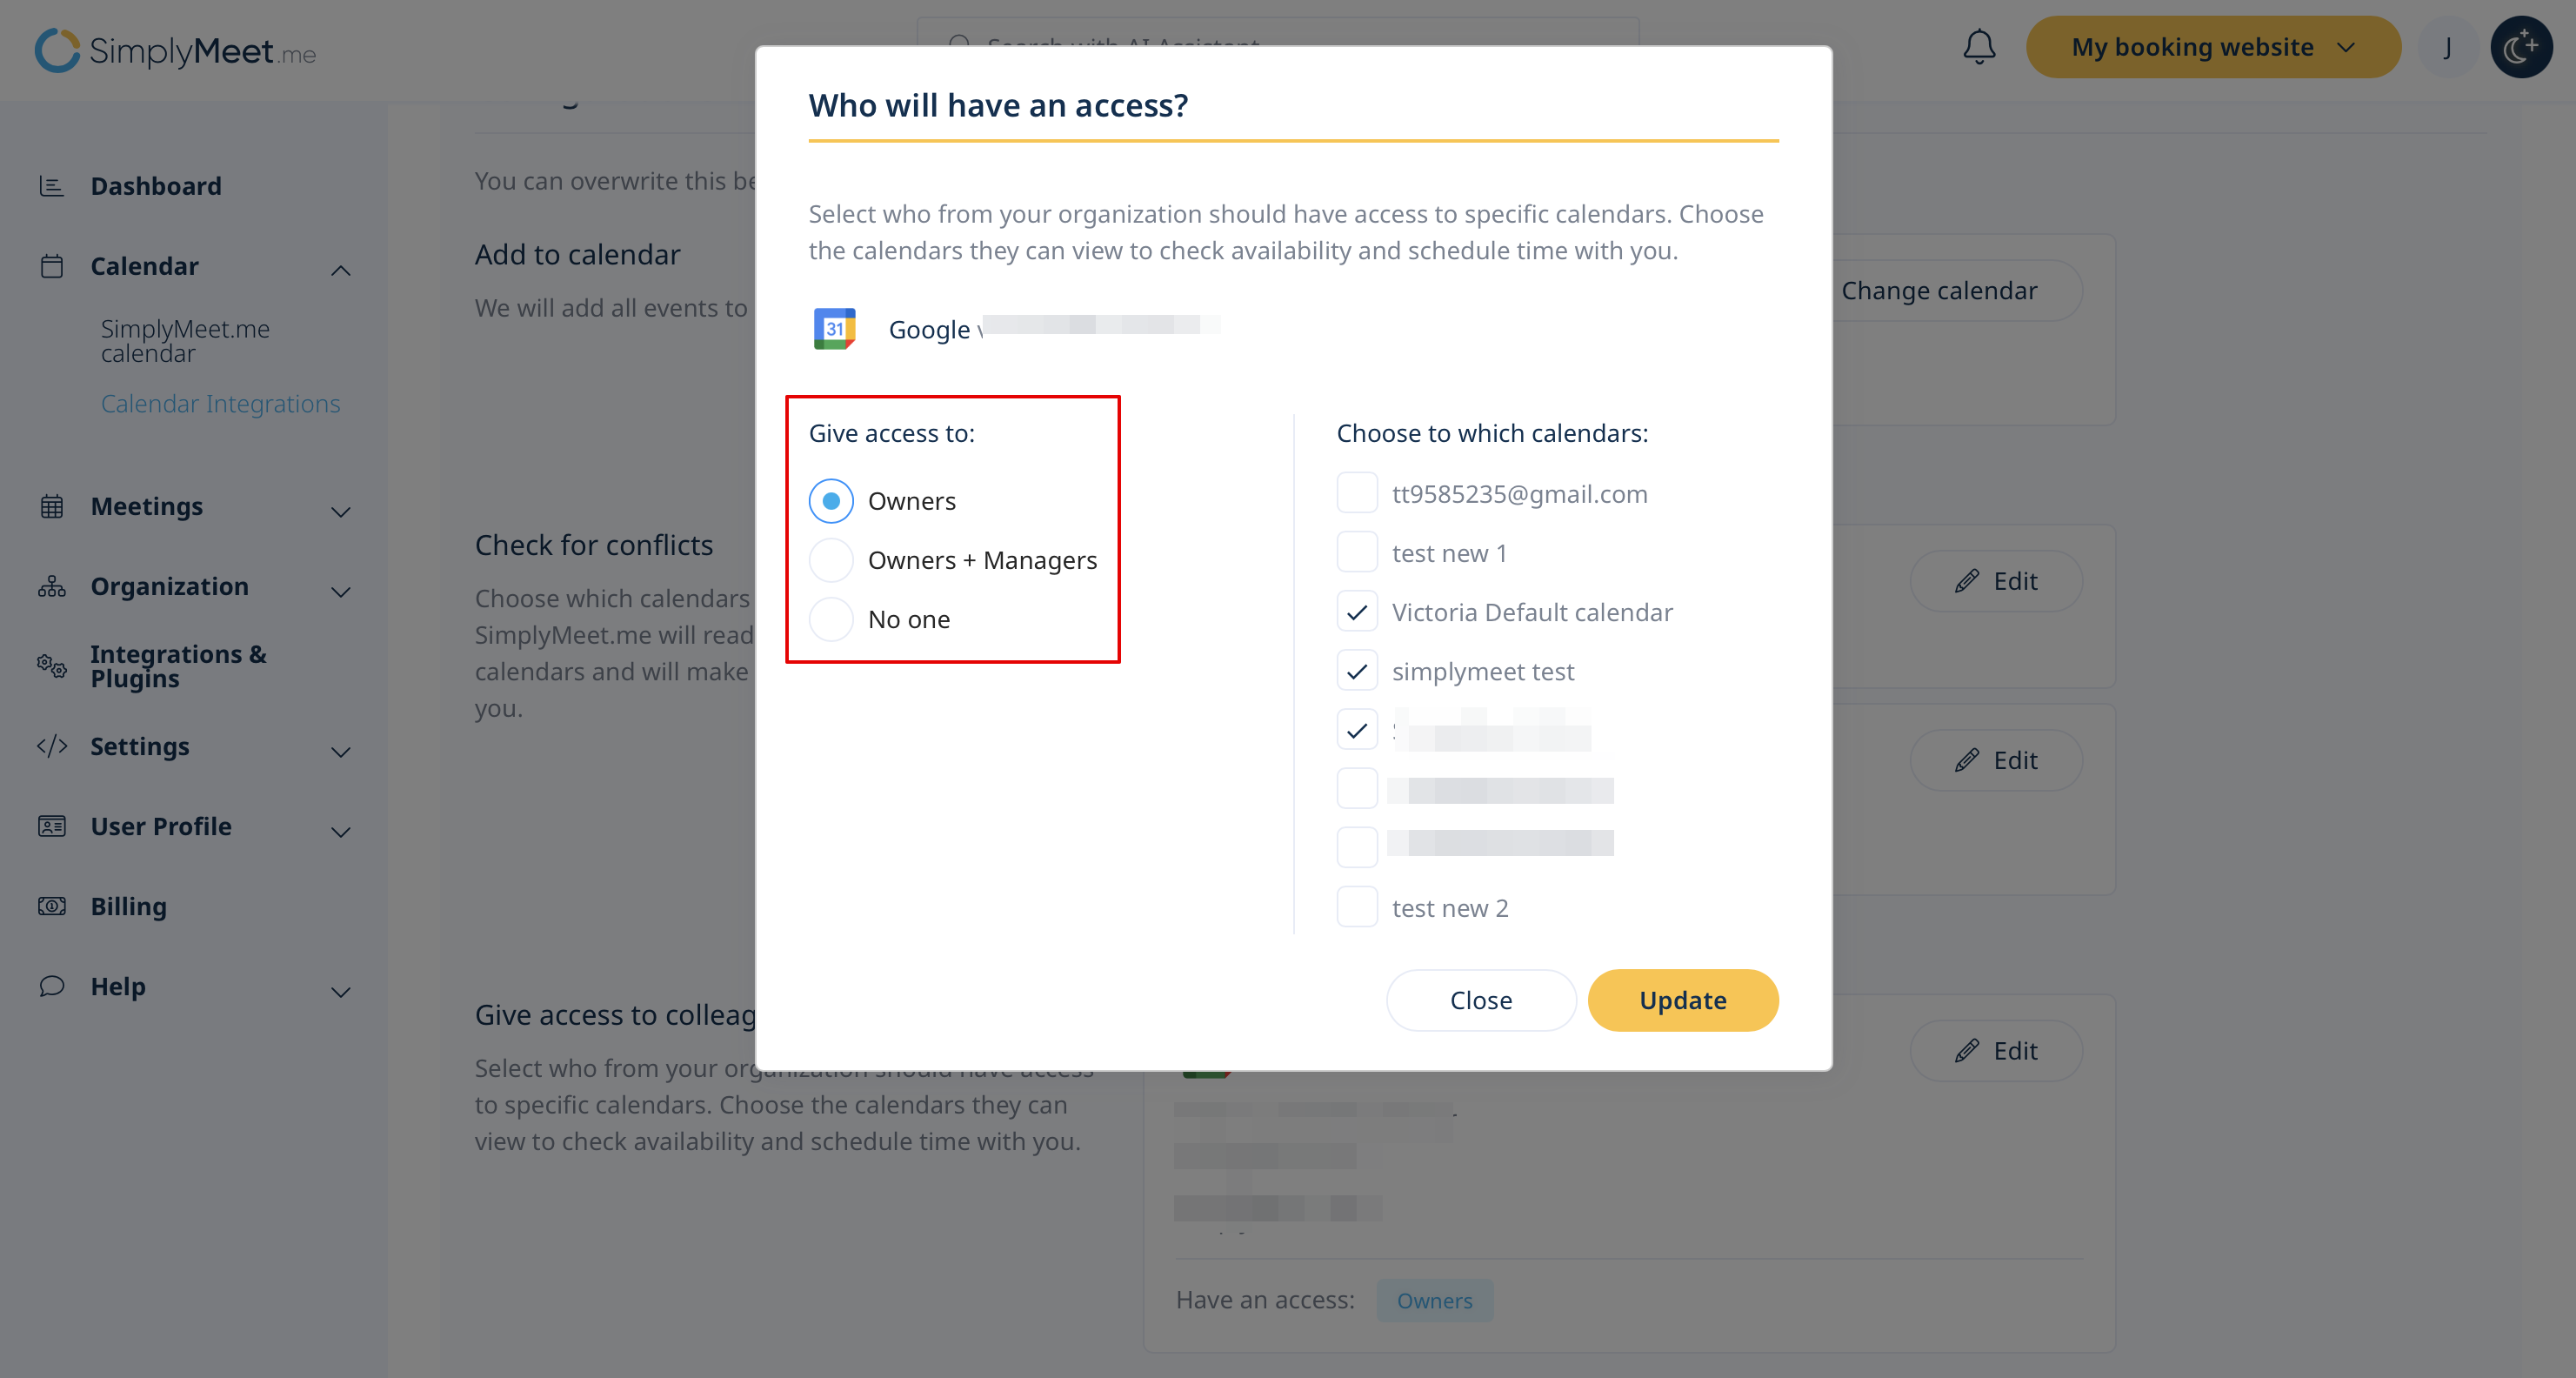
- Set user access levels: Assign visibility based on user tiers:
- Owners: Only the account owner can view and access shared calendars.
- Owners: Only the account owner can view and access shared calendars.
- Owners + Managers: Both the account owner and managers can view shared calendars.
- Owners + Managers: Both the account owner and managers can view shared calendars.
- No one: Shared calendars remain private and inaccessible to other users.
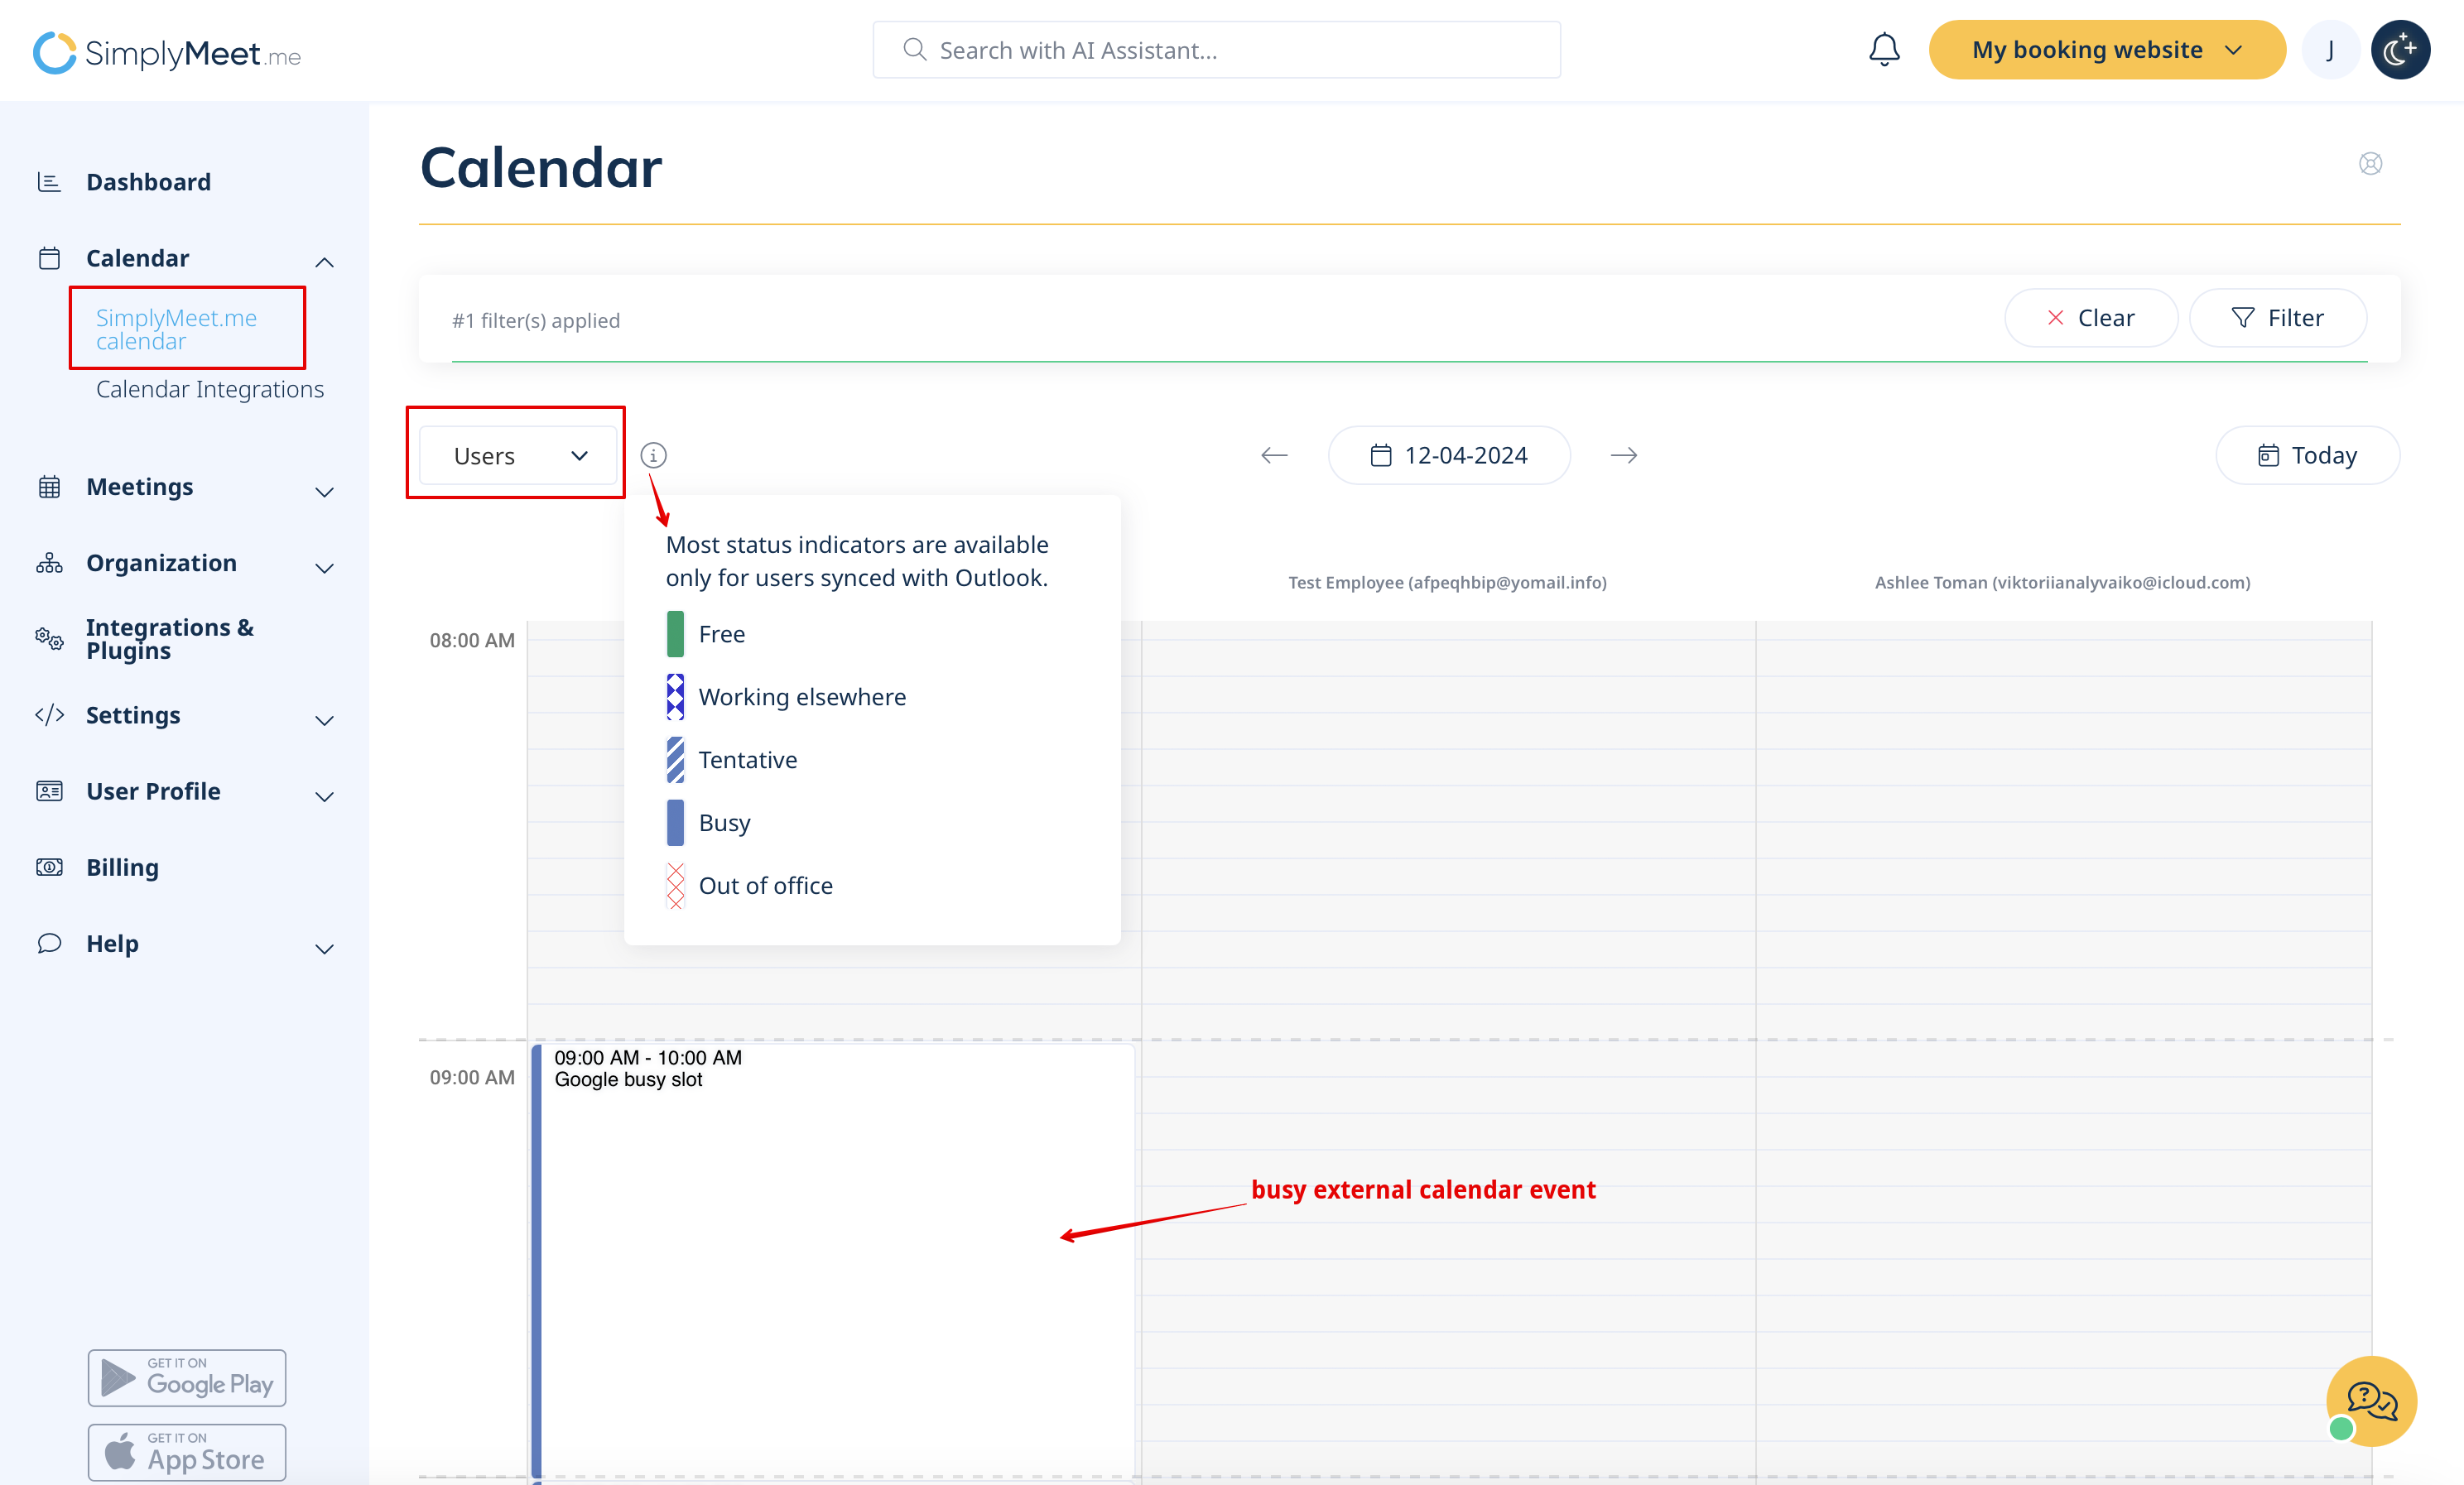
Step 4: Use the Users Calendar View
1. Navigate to the SimplyMeet.me calendar and select Users Calendar View from the dropdown.
2. Apply filters to focus on specific team members’ schedules.
3. Identify a suitable time slot by reviewing color-coded availability indicators.
Step 5: Schedule a Meeting
1. In the Users Calendar View, click on an available time slot in your SimplyMeet.me calendar.
2. The system will auto-add the filtered team members as participants.
3. Complete the meeting details, and confirm the appointment.