No edit summary |
No edit summary |
||
| (5 intermediate revisions by the same user not shown) | |||
| Line 54: | Line 54: | ||
<p> | <p> | ||
[[File:Simplymeet email notifications.png|1200px|center]] | [[File:Simplymeet email notifications.png|1200px|center]] | ||
</p> | |||
<p> | |||
4. Adjust the template text if necessary.<br> | |||
You can also decide if you would like to allow cancellations and/or rescheduling right from the notification per meeting type. | |||
</p> | |||
<p> | |||
[[File:Allow to cancel and reschedule.png|1200px|center|link=https://help.simplymeet.me/images/3/3b/Allow_to_cancel_and_reschedule.png]] | |||
</p> | |||
<p class="no-margin"> | |||
5. Click <strong>Save</strong> button. | |||
</p> | |||
<h2 id="email-reminders">Email Reminders</h2> | |||
<br><br> | |||
If you need to send SMS reminders, you can use [[SMS Gateway|SMS Integration]]. | |||
<br><br> | |||
<p> | |||
:'''Note!''' Editing the templates is available within '''Professional''' subscription. | |||
</p> | |||
<p class="no-margin"> | |||
To reduce no-shows you can automatically send email messages hours or minutes before the meeting starts. | |||
</p> | |||
<p class="no-margin"> | |||
</p> | </p> | ||
<div class="intercom-container"> | <div class="intercom-container"> | ||
[[File:Simplymeet reminders path.png|1200px|center]] | |||
</div> | </div> | ||
<p class="no-margin"> | <p class="no-margin"> | ||
4. Click <strong>Save</strong> | <strong>How to enable email reminders</strong> | ||
</p> | |||
<p class="no-margin"> | |||
</p> | |||
1. From the <strong>Meeting Types</strong> page, edit existing meeting type or create a new one.<br> | |||
2. Expand <strong>Reminders</strong> tab.<br> | |||
3. Under the <strong>Email Reminders</strong> section, there will be a default email message which will be sent to you and your invitee before the meeting. You can customize the body and the subject of the email reminder.<br> | |||
<p class="no-margin"> | |||
You can also add a | |||
<strong>merge tag</strong> by pointing your mouse to the place where you want to insert the tag. Then click the "merge tags" icon (see below). The list with all merge tags will show up. | |||
</p> | |||
<div class="intercom-container"> | |||
[[File:Simplymeet merge tag reminders path.png|1200px|center]] | |||
</div> | |||
<p class="no-margin"> | |||
</p> | |||
<p class="no-margin"> | |||
The merge tag will be replaced with the proper value when the message will be sent. For example, the | |||
<strong><nowiki>#{{meetingName}}</nowiki></strong> merge tag will be replaced with the name of your Meeting Type. | |||
</p> | |||
<p class="no-margin"> | |||
4. At | |||
<strong>Timing </strong>specify the how many hours or minutes before the meeting you want to send the reminder. You can add additional reminders by clicking the <strong>Add new reminder.</strong> | |||
</p> | |||
<p class="no-margin"> | |||
5. Click | |||
<strong>Save</strong>. | |||
</p> | |||
<p class="no-margin"> | |||
By default, email reminders will be sent to you and your invitee. | |||
</p> | </p> | ||
<h2 id="follow-up-notifications">Follow up notifications</h2> | <h2 id="follow-up-notifications">Follow up notifications</h2> | ||
Follow-up notification is a feature offered by the SimplyMeet.me meeting scheduling solution allowing users to set a “follow-up” with clients after their appointment. This feature lets users decide when and how many to send follow-up notifications to their clients.<br> | Follow-up notification is a feature offered by the SimplyMeet.me meeting scheduling solution allowing users to set a “follow-up” with clients after their appointment. This feature lets users decide when and how many to send follow-up notifications to their clients.<br> | ||
:'''Note!''' Editing the templates is available within '''Professional''' subscription.<br><br> | |||
;How to use | |||
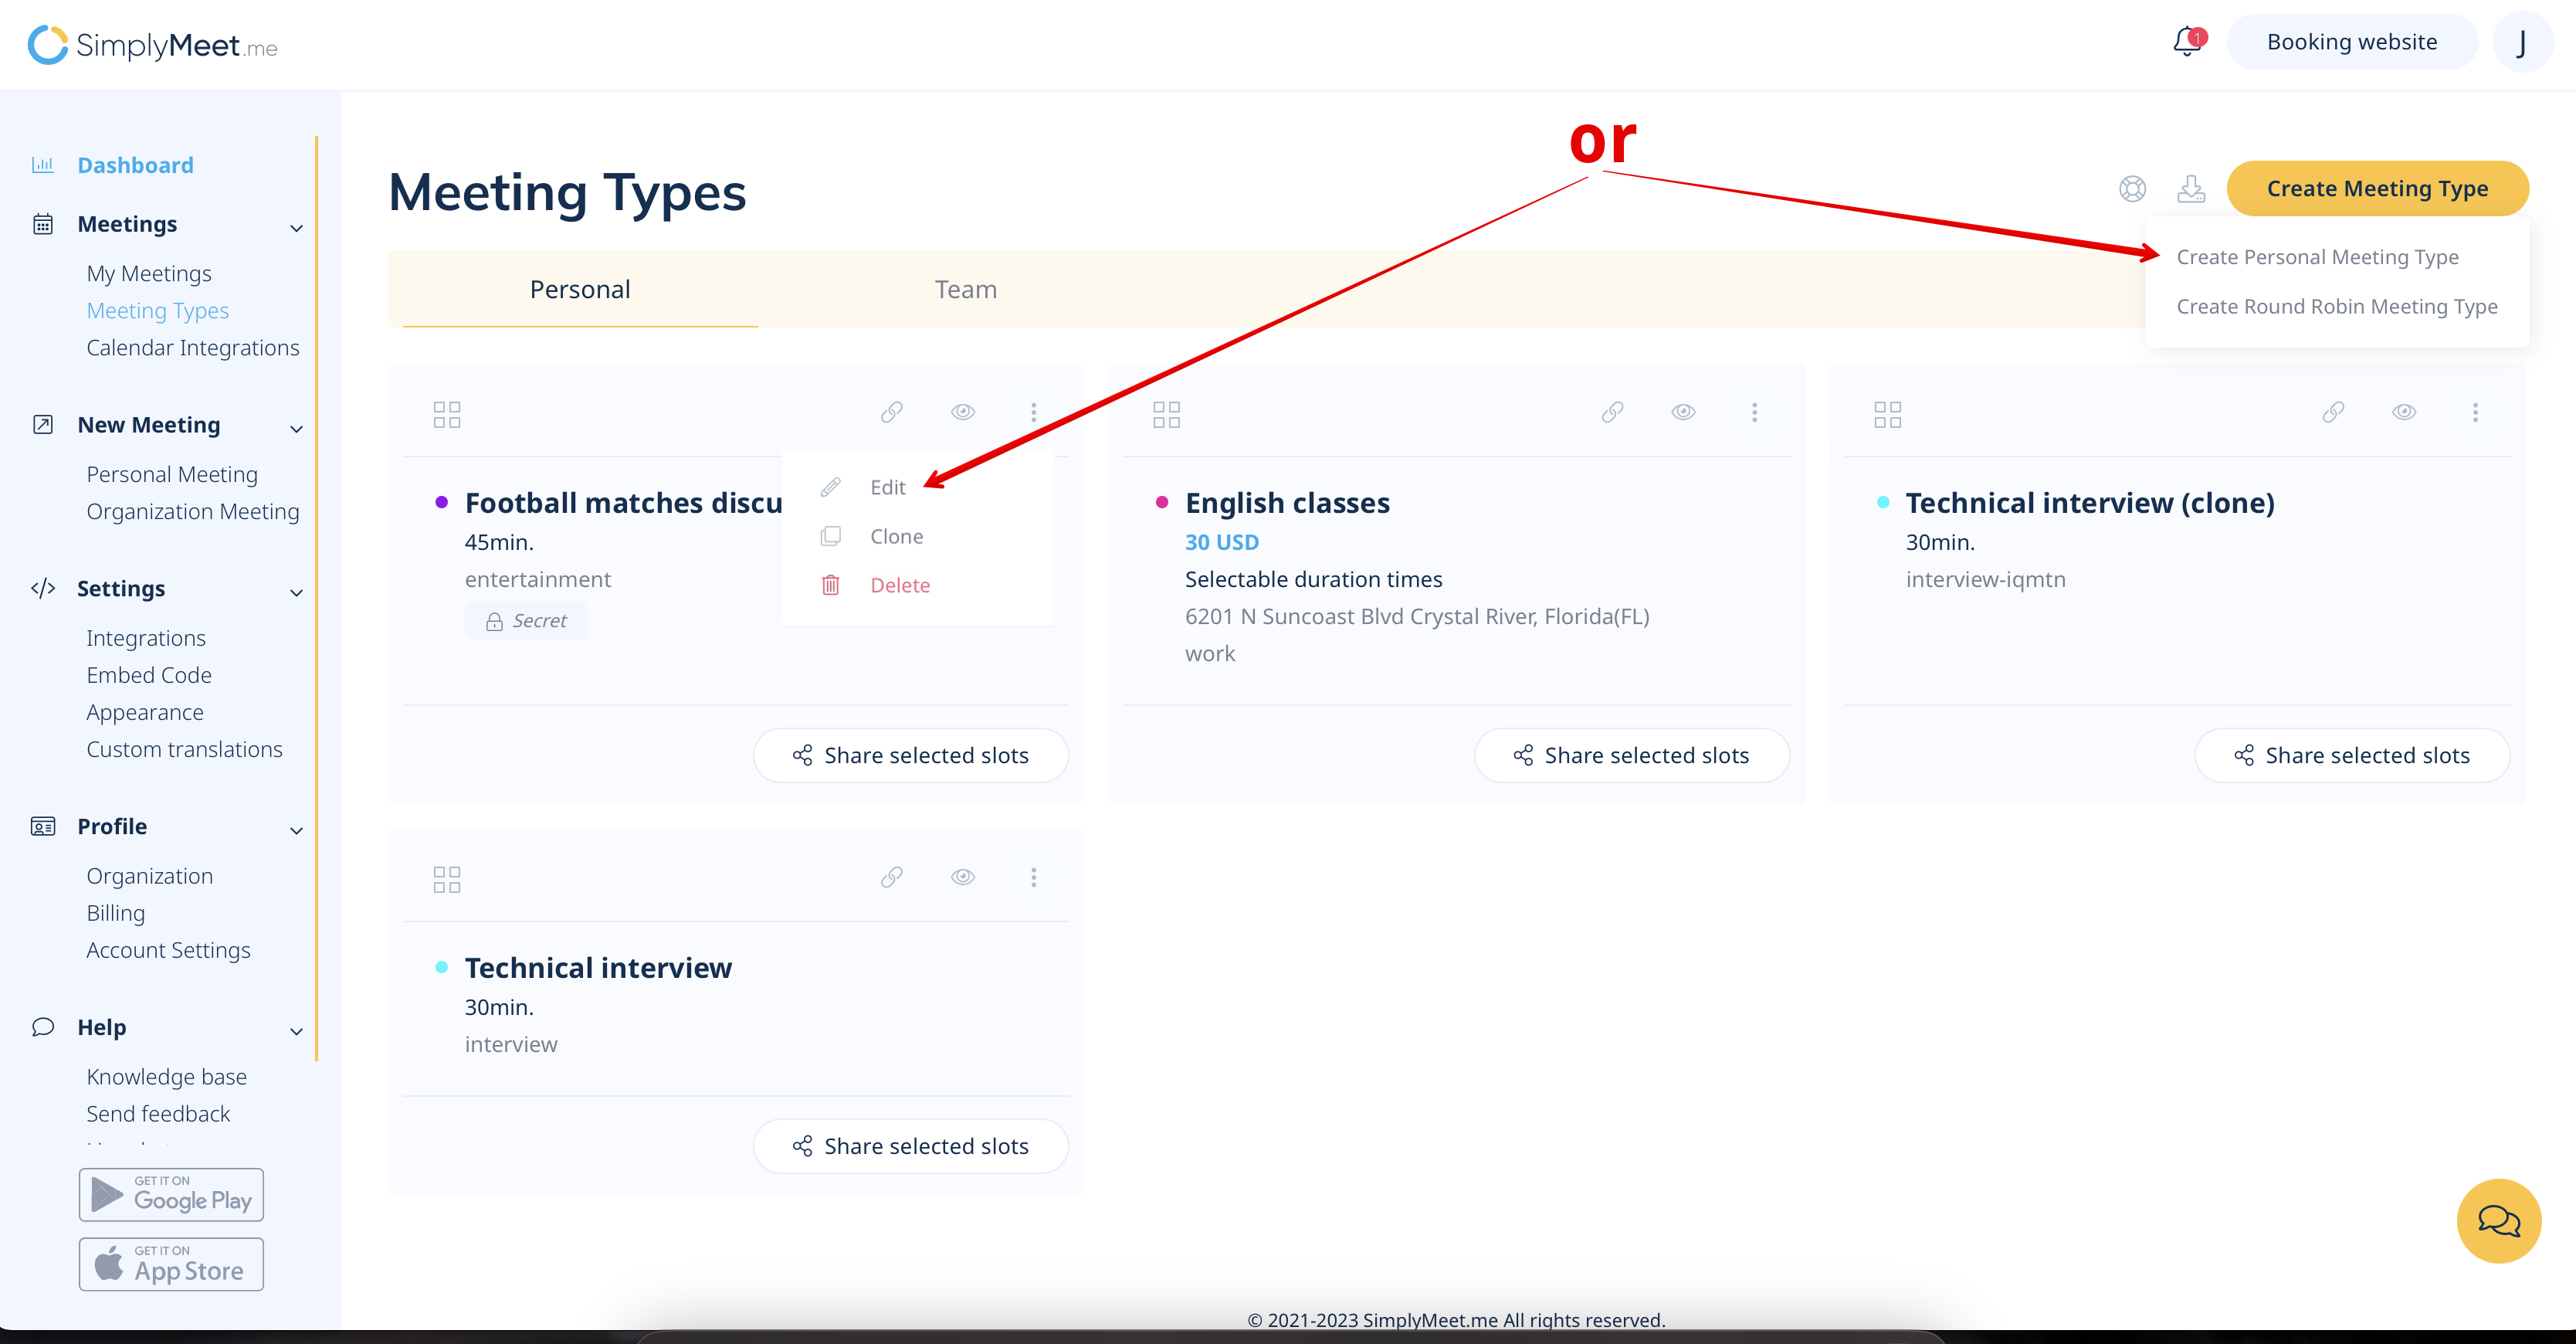
:1. Navigate to your '''[https://secure.simplymeet.me/event_types/ Meeting types page]''' and select to edit the desired meeting type or create a new one (if necessary) | |||
[[File:Create or edit personal meeting type.png|1200px|center|link=https://help.simplymeet.me/images/0/09/Create_or_edit_personal_meeting_type.png]] | |||
<br><br> | |||
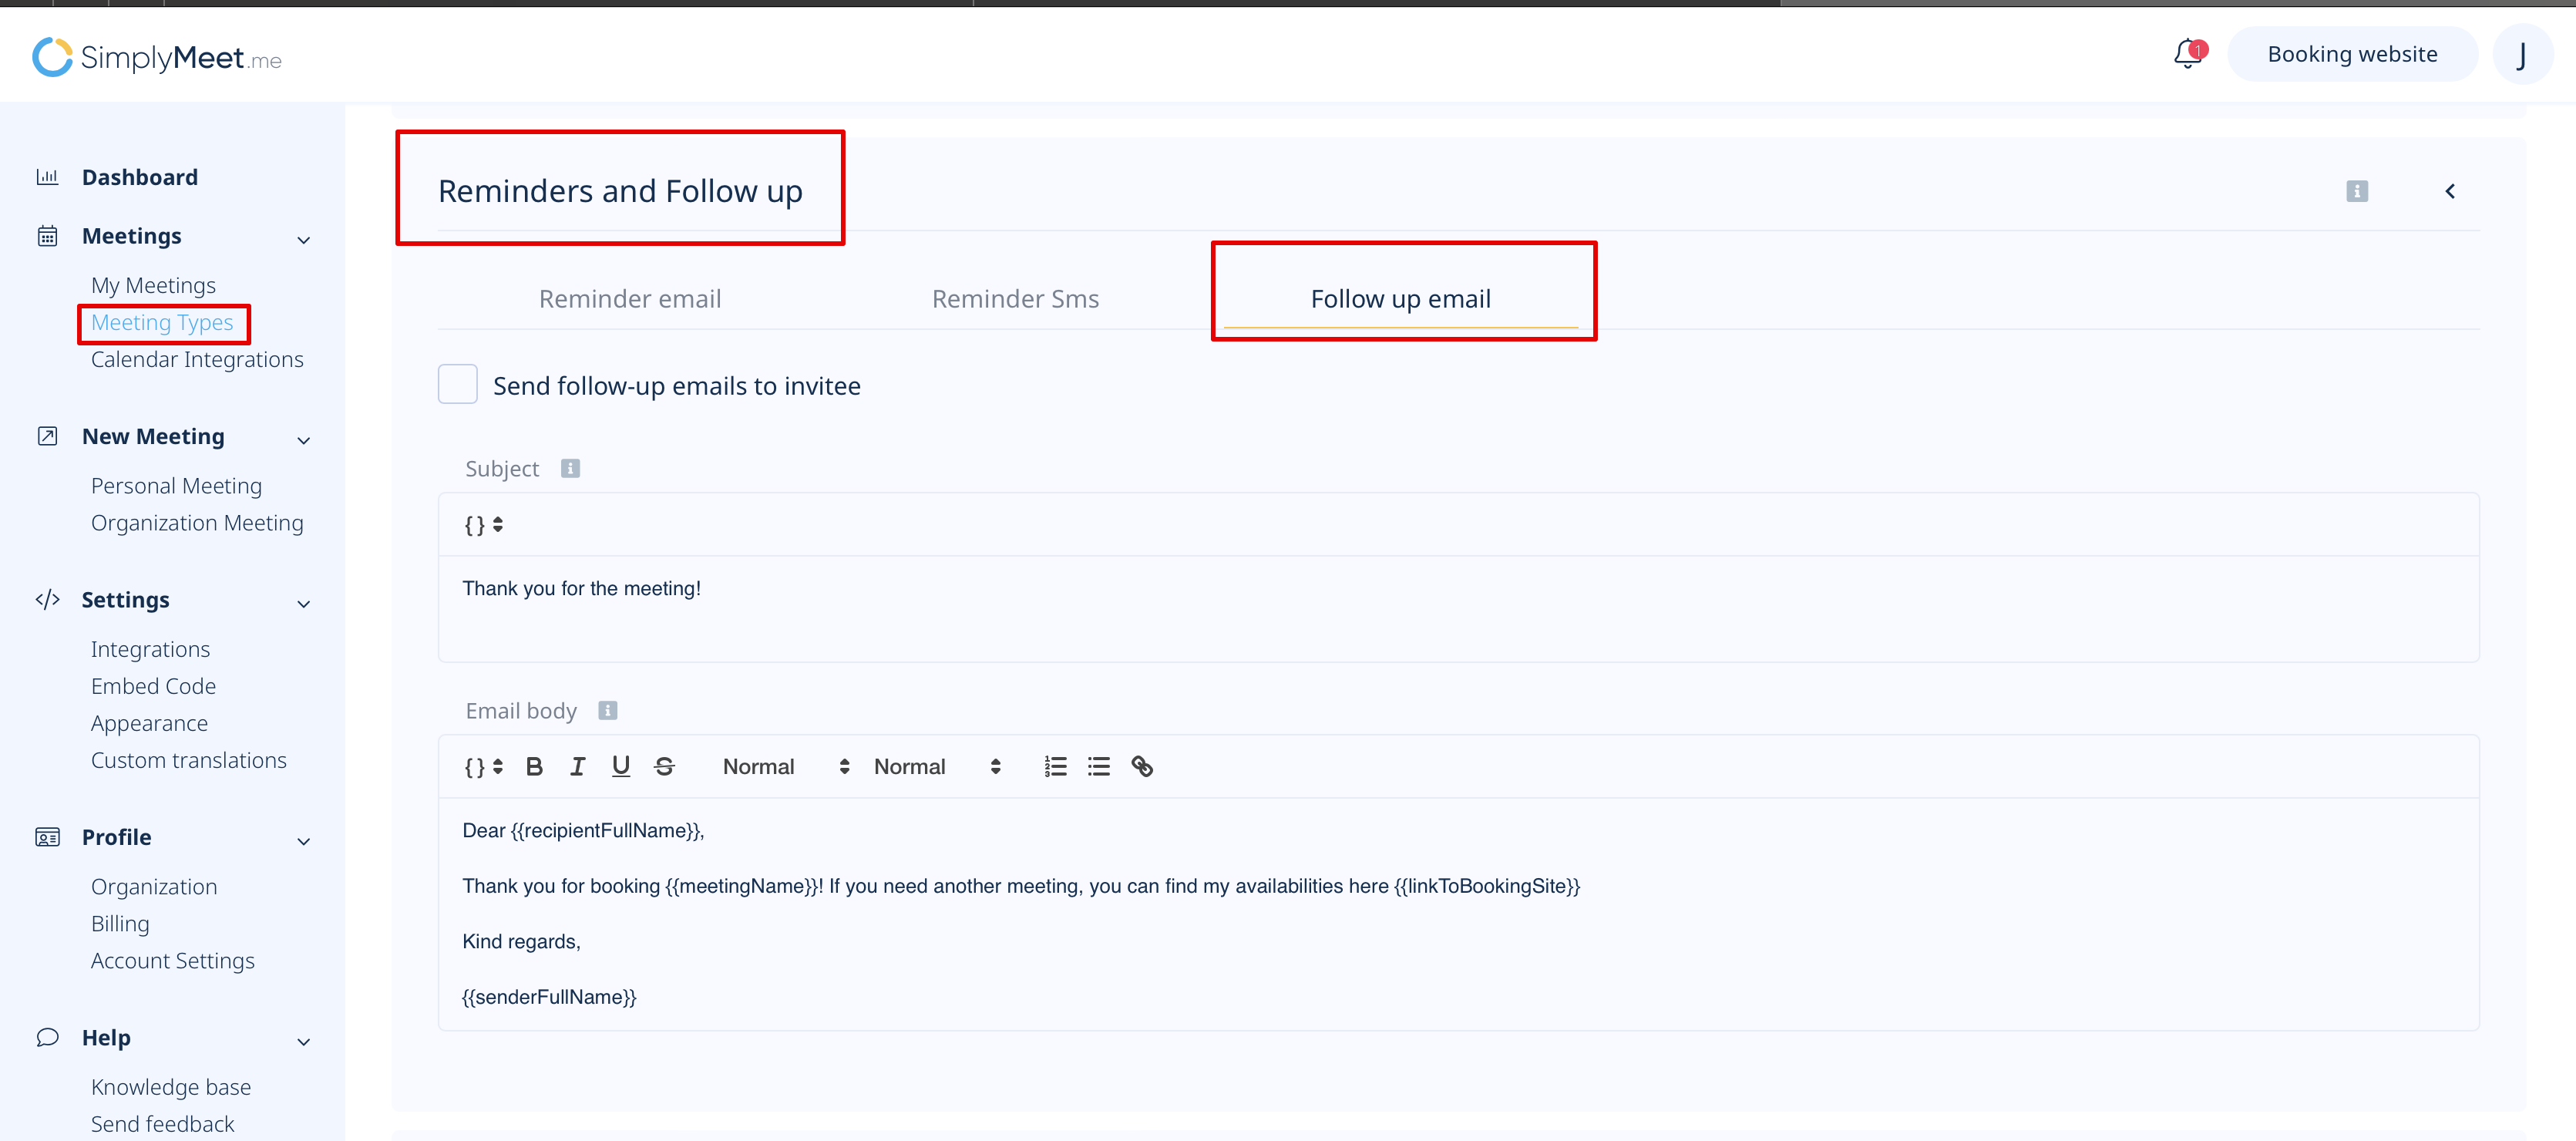
:2. Scroll the page to the '''Reminders and follow-up block''' and choose '''Follow up email''' option. | |||
[[File:Follow up email path.png|1200px|center|link=https://help.simplymeet.me/images/9/9e/Follow_up_email_path.png]] | |||
<br><br> | |||
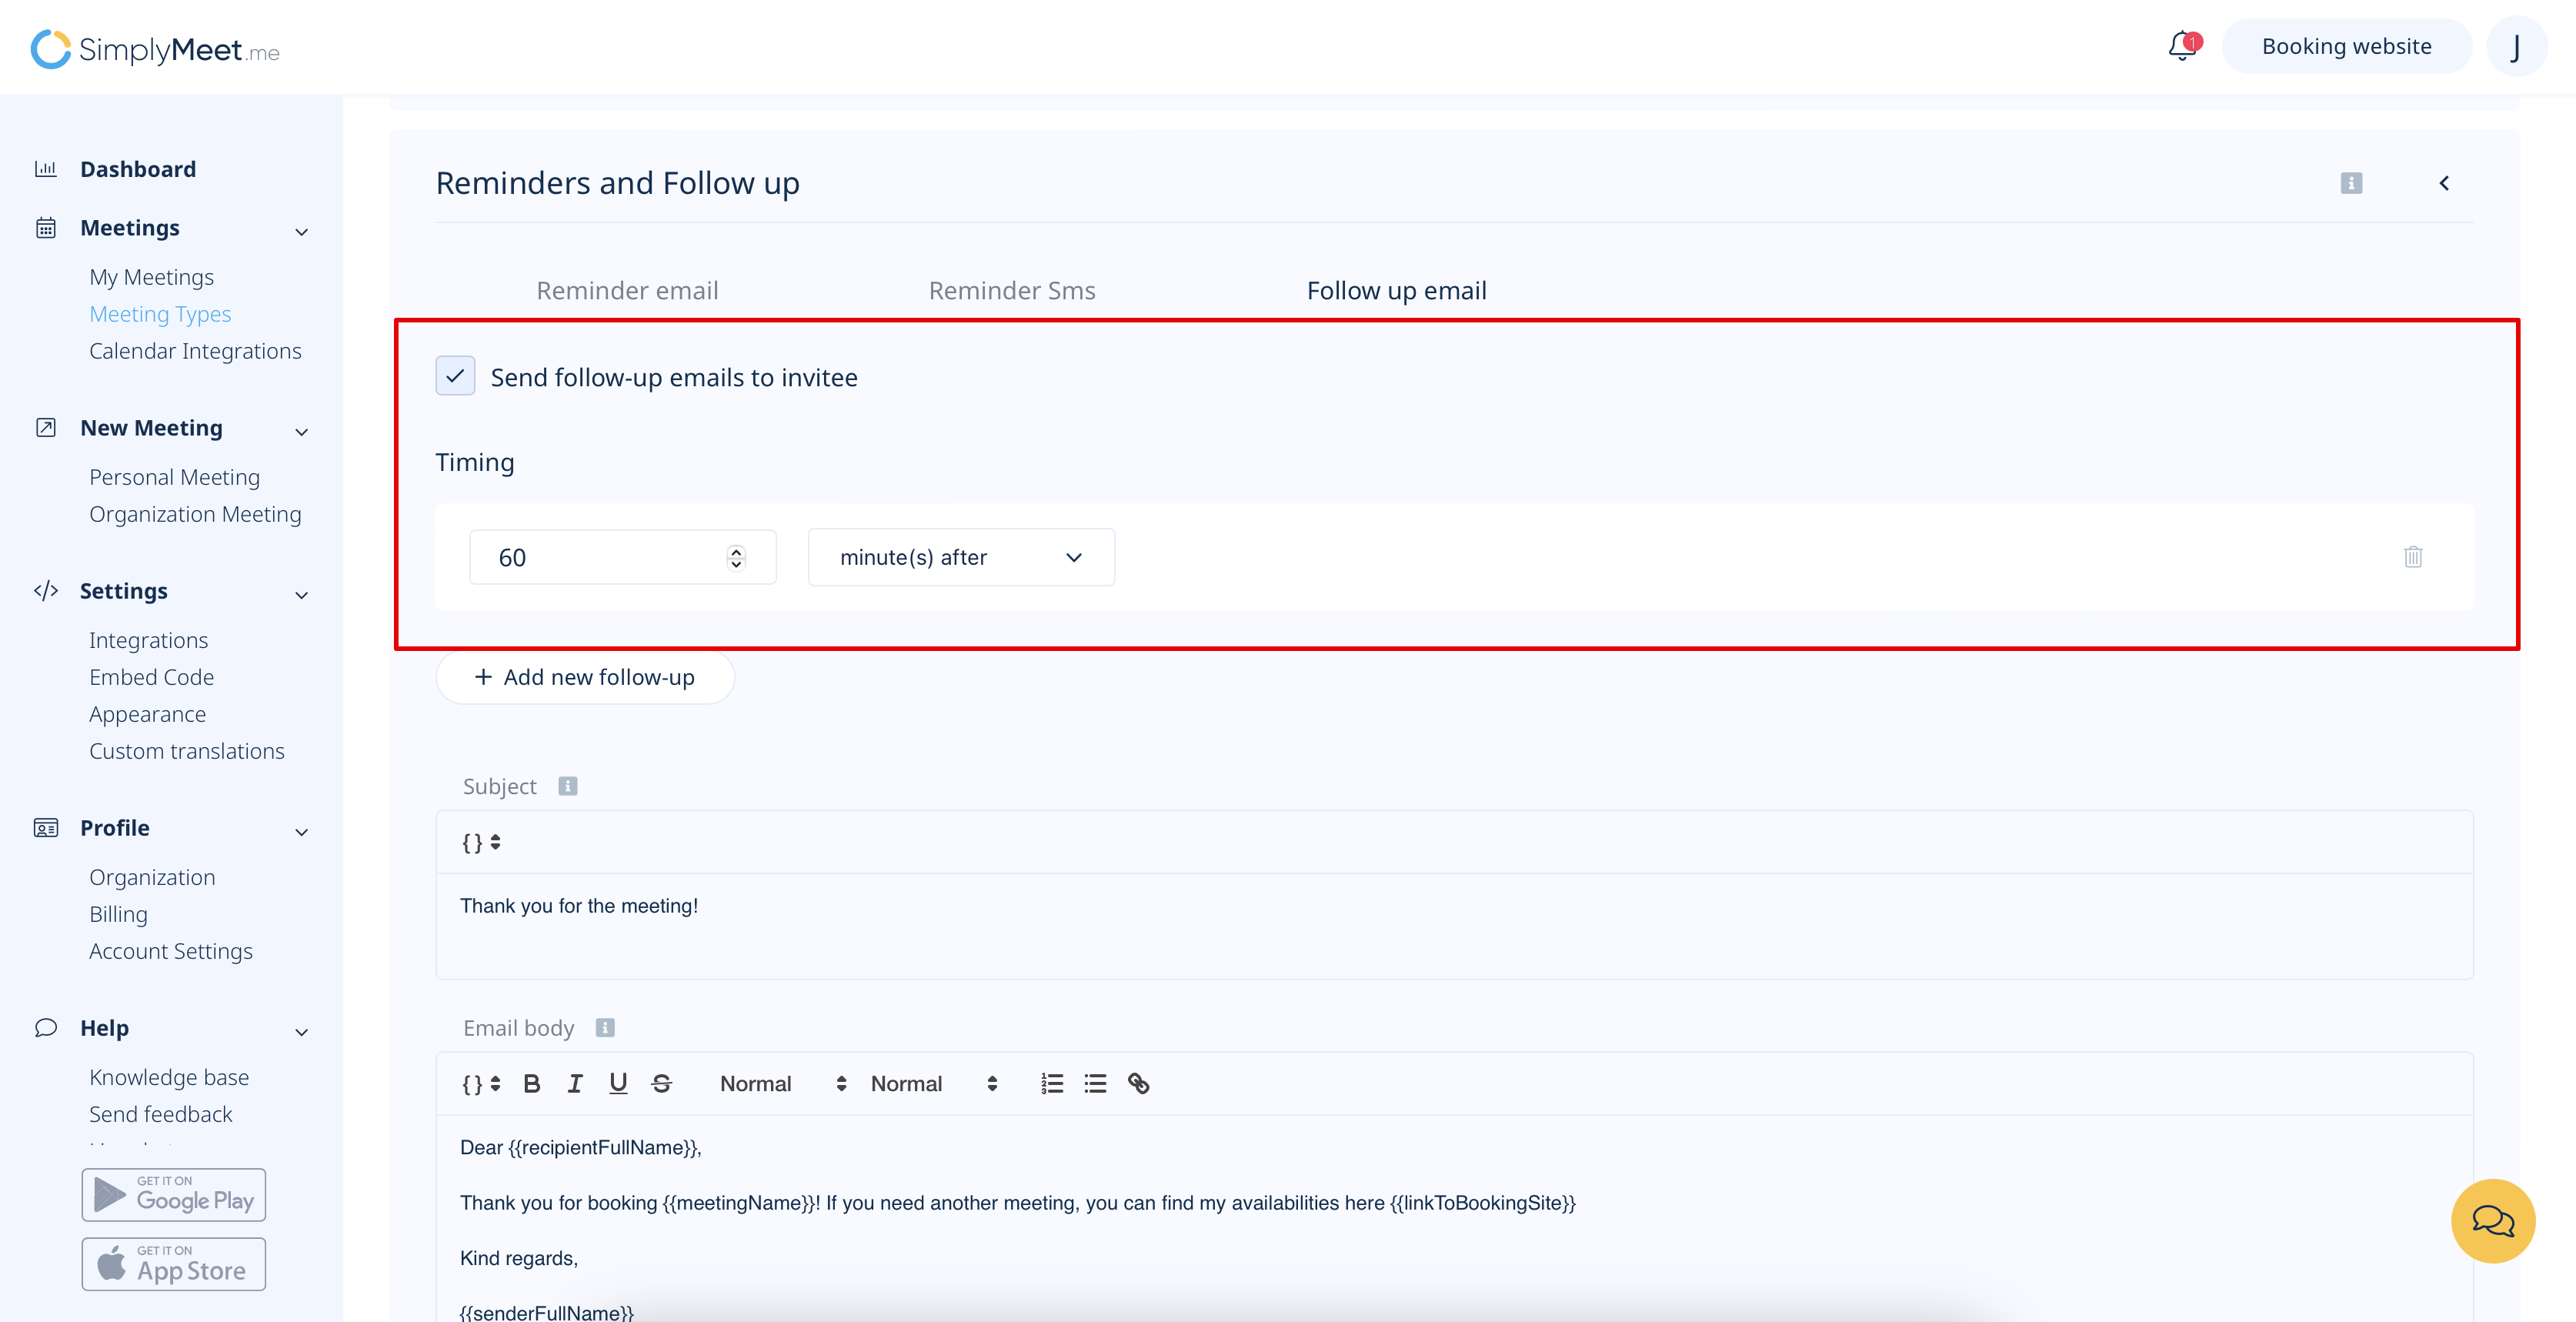
:3. Check the box '''Send follow-up emails to invitee''' and set the time when the notification should be sent to the customer. | |||
[[File:Set follow up timing.png|1200px|center|link=https://help.simplymeet.me/images/6/67/Set_follow_up_timing.png]] | |||
<br><br> | |||
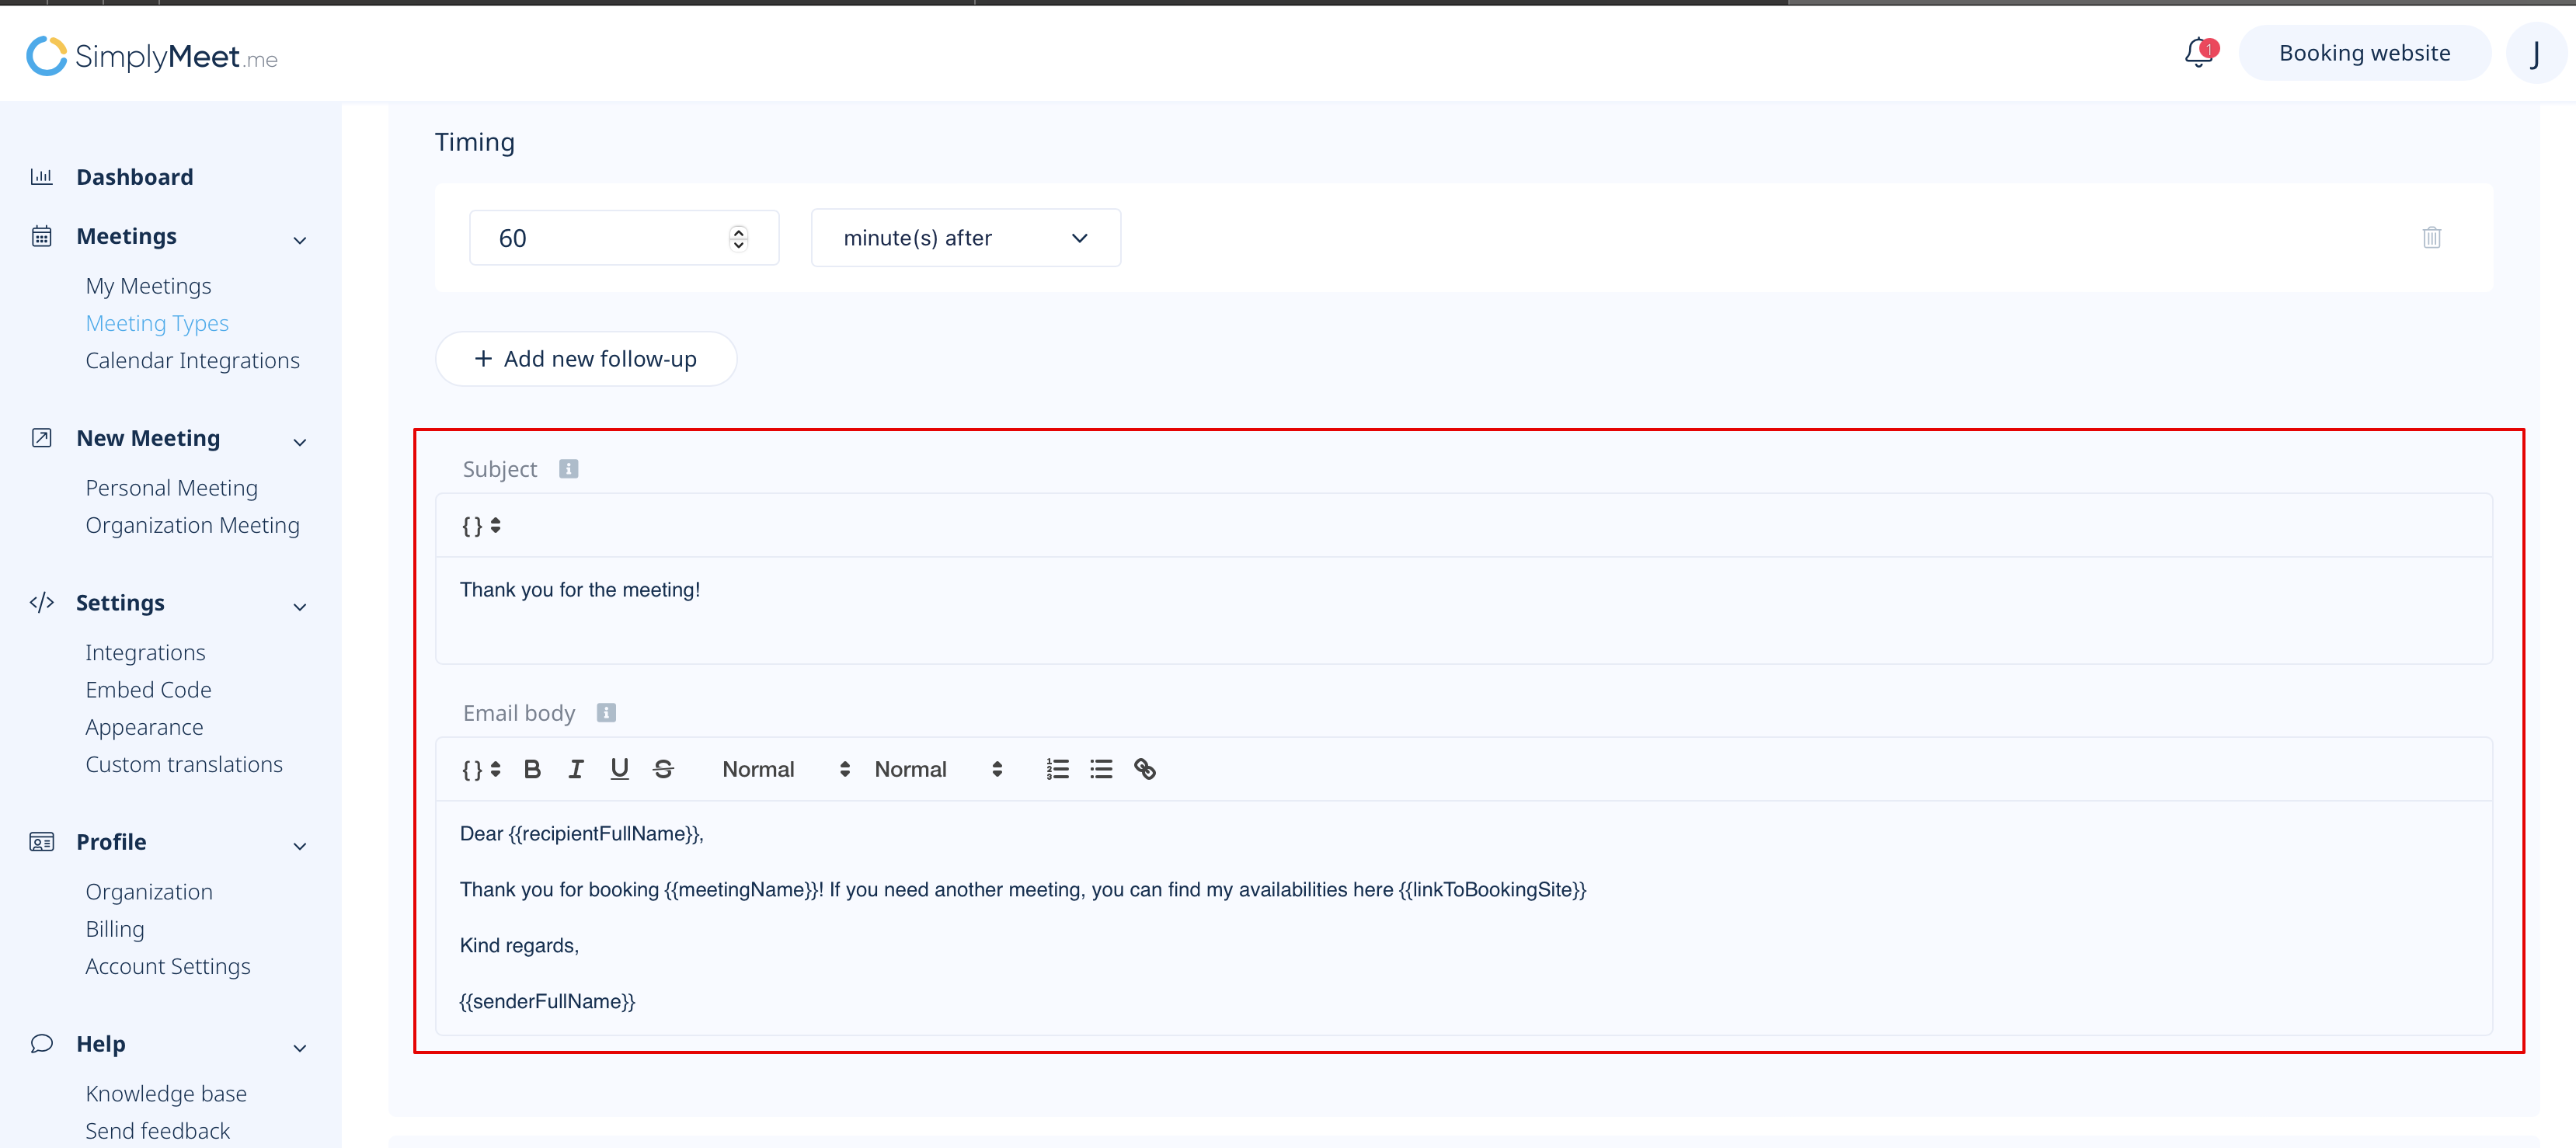
:4. Adjust the email template if necessary. | |||
:Save settings. | |||
[[File:Set follow up email.png|1200px|center|link=https://help.simplymeet.me/images/1/12/Set_follow_up_email.png]] | |||
<br><br> | |||
<h2 id="how-to-enable-additional-notification-emails">How to enable Additional Notification Emails</h2> | |||
You can add extra email addresses to receive meeting confirmations alongside the admin's email.<br> | |||
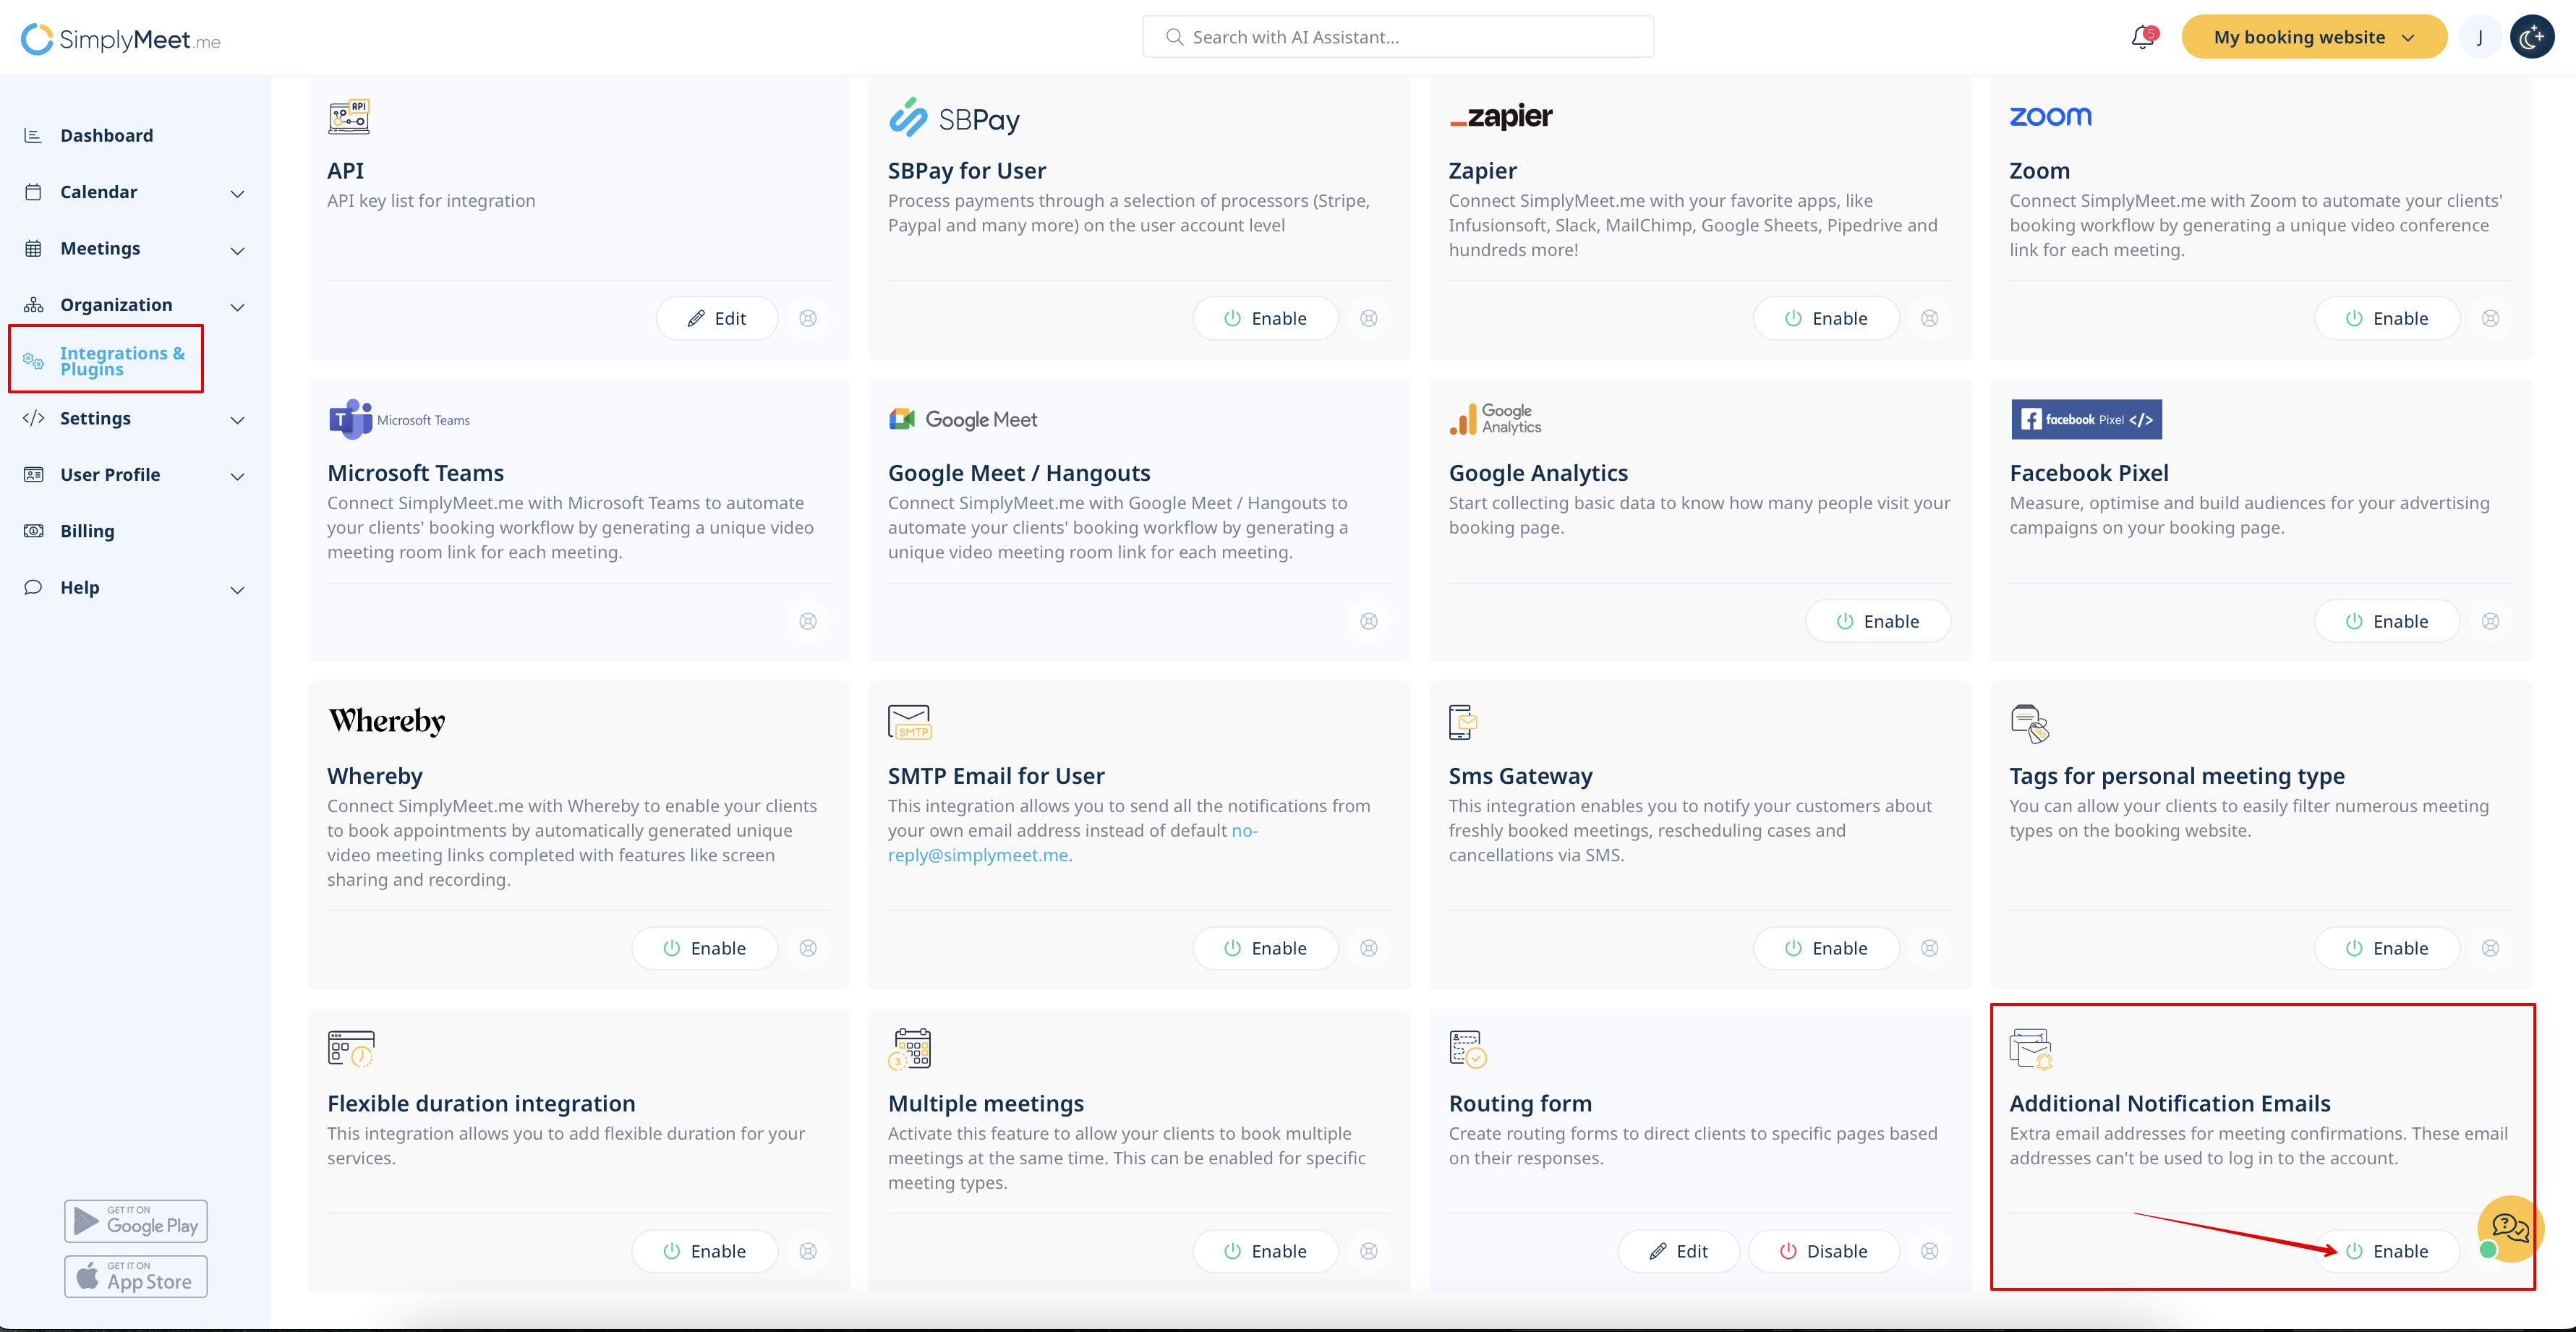
1. Navigate to '''Integrations & Plugins''' -> '''Additional Notification Emails''' -> '''Enable'''. | |||
[[File:Sm additional notification emails enable path.png|1200px|center|link=https://help.simplymeet.me/images/e/e1/Sm_additional_notification_emails_enable_path.png]] | |||
<br><br> | |||
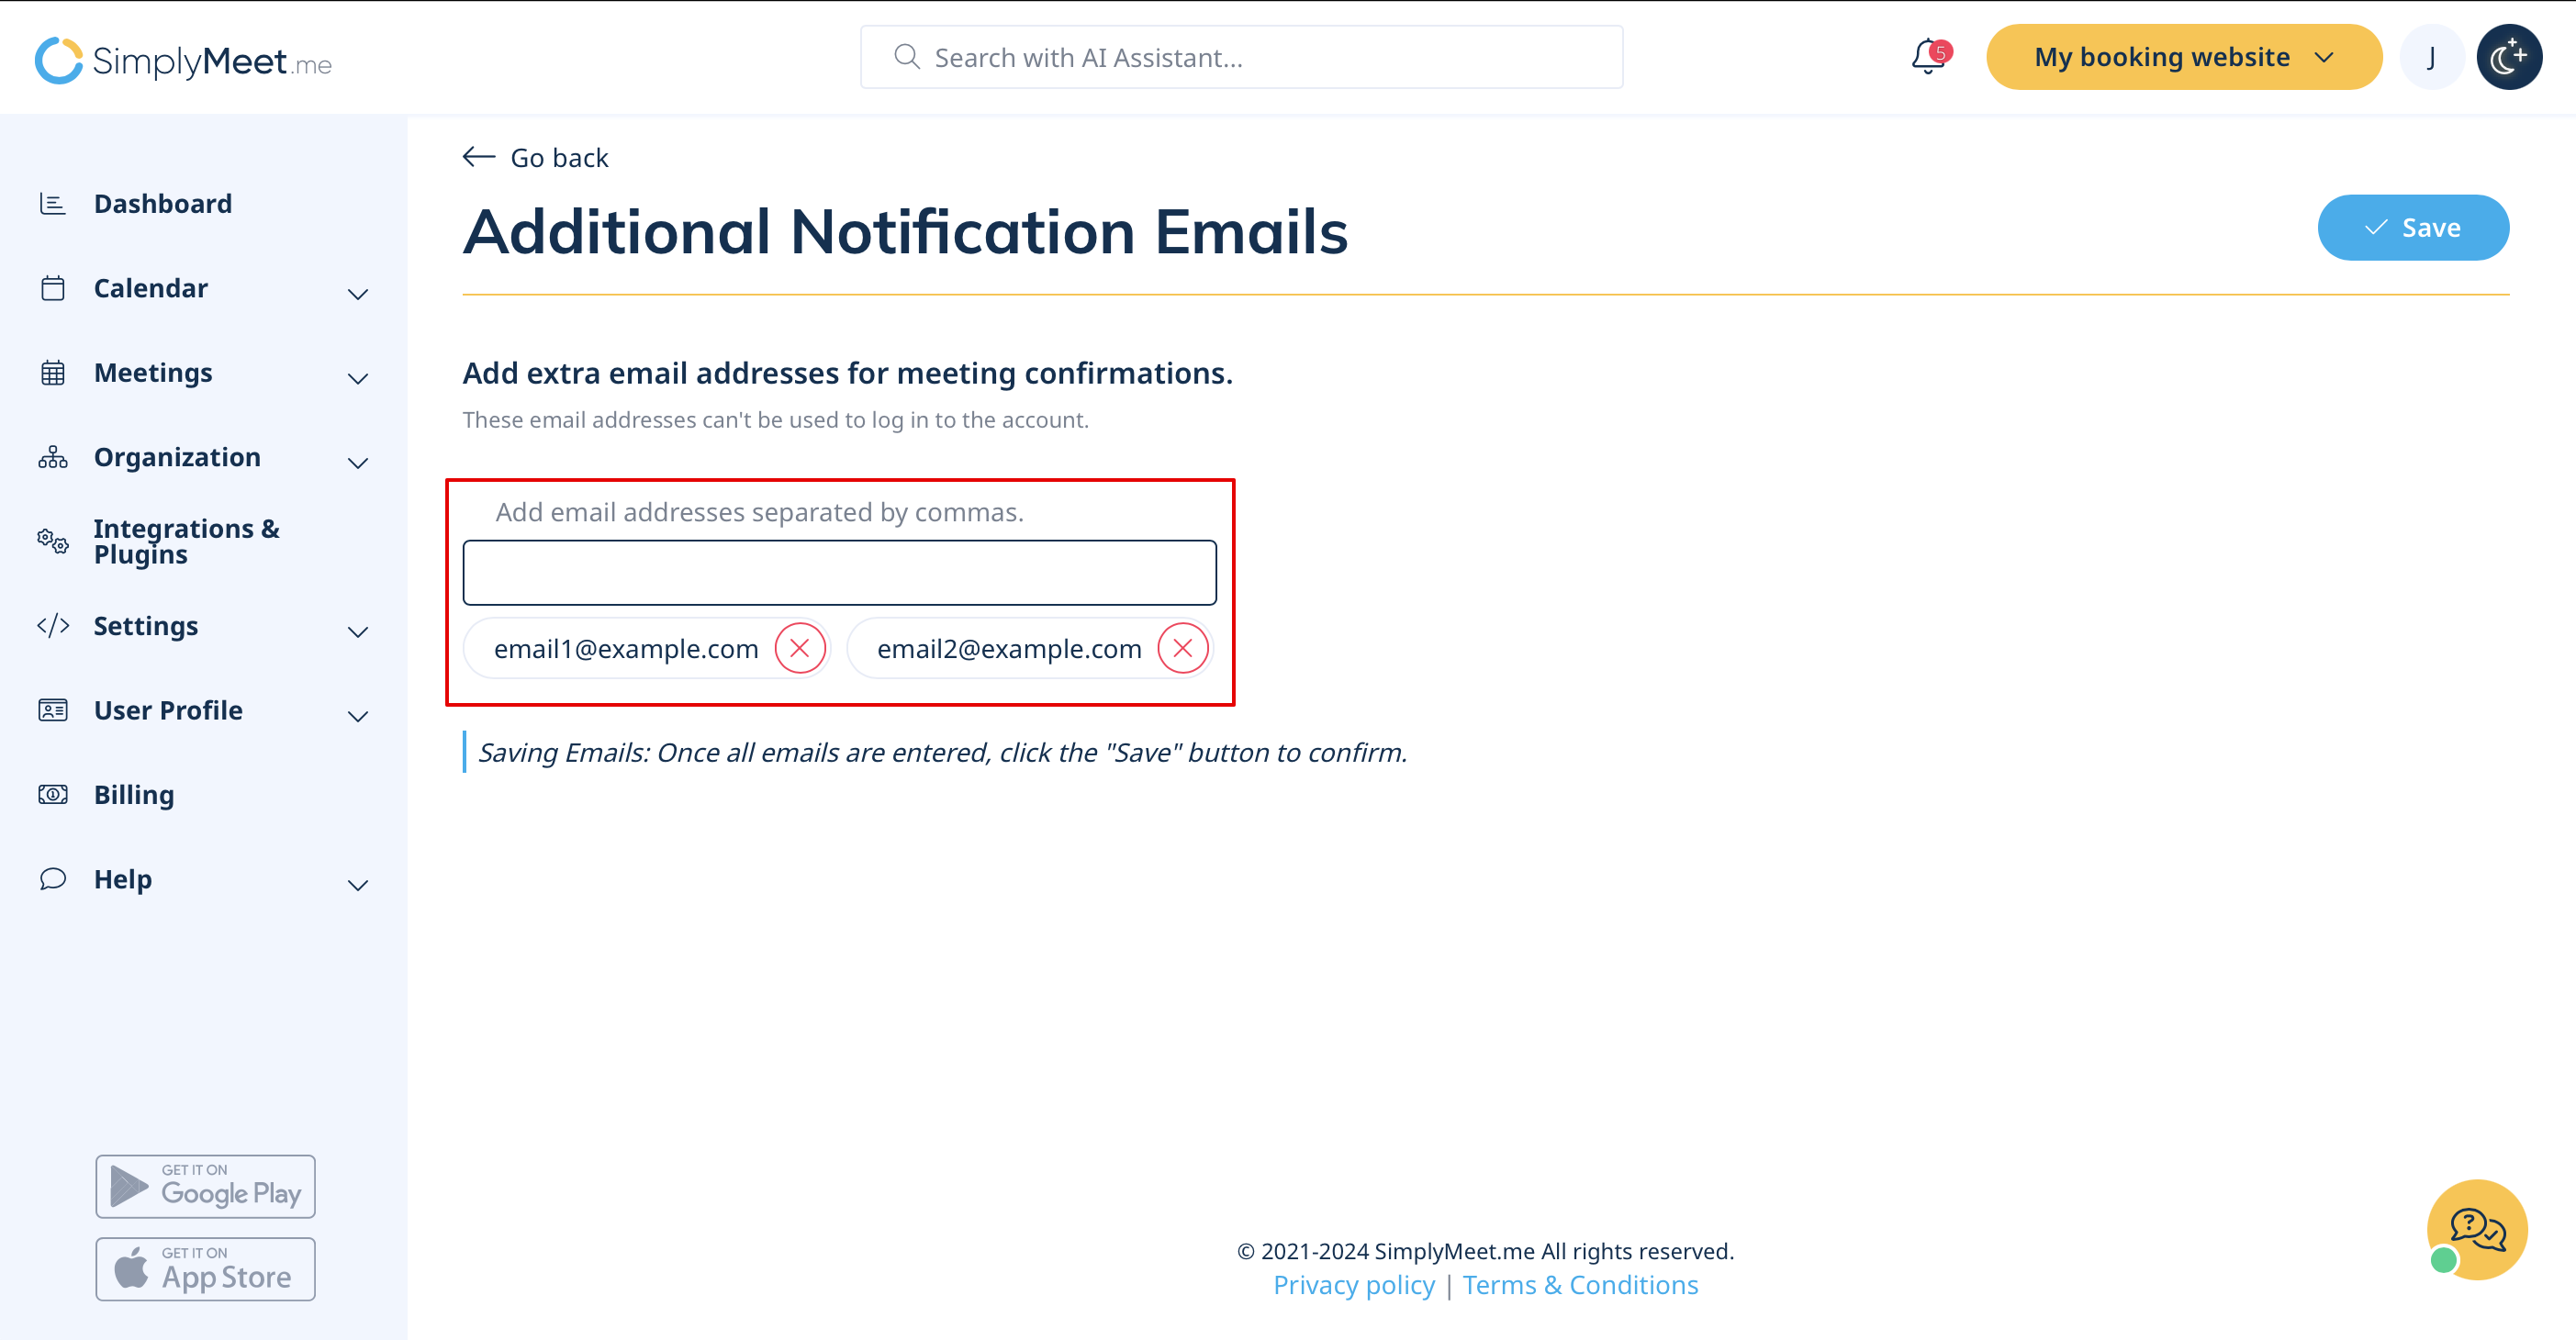
2. Find "Add extra email addresses for meeting confirmations" item.<br> | |||
3. Add email addresses separated by commas (e.g., email1@example.com, email2@example.com). | |||
[[File:Sm add additional emails.png|1200px|center|link=https://help.simplymeet.me/images/8/80/Sm_add_additional_emails.png]] | |||
<br><br> | |||
4. Save the changes. | |||
<br><br> | |||
'''Note!''' Your registered email will still receive all notifications and is the only email used for logging in. | |||
<br><br> | |||
<br><br> | <br><br> | ||
Latest revision as of 14:25, 11 November 2024
By default, when the invitee schedules a new meeting with you, SimplyMeet.me sends a notification email with the details about newly scheduled meetings.
This email notification contains a link your invitees can use to add the event to their calendar.
When you connect your online calendar (Outlook, Google etc.), SimplyMeet.me can send the calendar invitation/notification directly from your online calendar that automatically adds the event to both your calendars.
The invitee will be added as an attendee to the same event in your calendar
How to enable calendar notifications
1. Go to Meeting Types and edit one of the meeting types.
2. Expand the Notifications & Email Templates section.
3. Choose the Calendar Notifications from the Notifications Type dropdown.

4.Click Save button.
Here is an example Google calendar notification about scheduled meeting your invitees will receive.

You didn’t get a notification?
Make sure the Calendar Notifications in your Google Calendar are turned on.
How to enable email notifications
- Note! Editing the templates is available within Professional subscription.
1. Go to Meeting Types and edit one of the meeting types.
2. Expand the Notifications & Email Templates section.
3. Choose the Email Notifications from the Notifications Type dropdown.

4. Adjust the template text if necessary.
You can also decide if you would like to allow cancellations and/or rescheduling right from the notification per meeting type.

5. Click Save button.
Email Reminders
If you need to send SMS reminders, you can use SMS Integration.
- Note! Editing the templates is available within Professional subscription.
To reduce no-shows you can automatically send email messages hours or minutes before the meeting starts.

How to enable email reminders
1. From the Meeting Types page, edit existing meeting type or create a new one.
2. Expand Reminders tab.
3. Under the Email Reminders section, there will be a default email message which will be sent to you and your invitee before the meeting. You can customize the body and the subject of the email reminder.
You can also add a merge tag by pointing your mouse to the place where you want to insert the tag. Then click the "merge tags" icon (see below). The list with all merge tags will show up.

The merge tag will be replaced with the proper value when the message will be sent. For example, the #{{meetingName}} merge tag will be replaced with the name of your Meeting Type.
4. At Timing specify the how many hours or minutes before the meeting you want to send the reminder. You can add additional reminders by clicking the Add new reminder.
5. Click Save.
By default, email reminders will be sent to you and your invitee.
Follow up notifications
Follow-up notification is a feature offered by the SimplyMeet.me meeting scheduling solution allowing users to set a “follow-up” with clients after their appointment. This feature lets users decide when and how many to send follow-up notifications to their clients.
- Note! Editing the templates is available within Professional subscription.
- How to use
- 1. Navigate to your Meeting types page and select to edit the desired meeting type or create a new one (if necessary)
- 2. Scroll the page to the Reminders and follow-up block and choose Follow up email option.
- 3. Check the box Send follow-up emails to invitee and set the time when the notification should be sent to the customer.
- 4. Adjust the email template if necessary.
- Save settings.
How to enable Additional Notification Emails
You can add extra email addresses to receive meeting confirmations alongside the admin's email.
1. Navigate to Integrations & Plugins -> Additional Notification Emails -> Enable.
2. Find "Add extra email addresses for meeting confirmations" item.
3. Add email addresses separated by commas (e.g., email1@example.com, email2@example.com).
4. Save the changes.
Note! Your registered email will still receive all notifications and is the only email used for logging in.