Created page with "<span style="background-color:#d4f8e5; padding:5px; border-radius:5px;">COMING SOON</SPAN>" |
No edit summary |
||
| (9 intermediate revisions by the same user not shown) | |||
| Line 1: | Line 1: | ||
< | <p>Collect payments from clients at time of booking with PayPal, Stripe, Adyen and many other processors via SBPay in just a few simple steps.</p> | ||
You can use the integration on the user account level as well as organization one (with paid subscriptions). | |||
;How to set | |||
<p> | |||
1. Navigate to your [https://secure.simplymeet.me/integrations Integrations] page.</p> | |||
<p> | |||
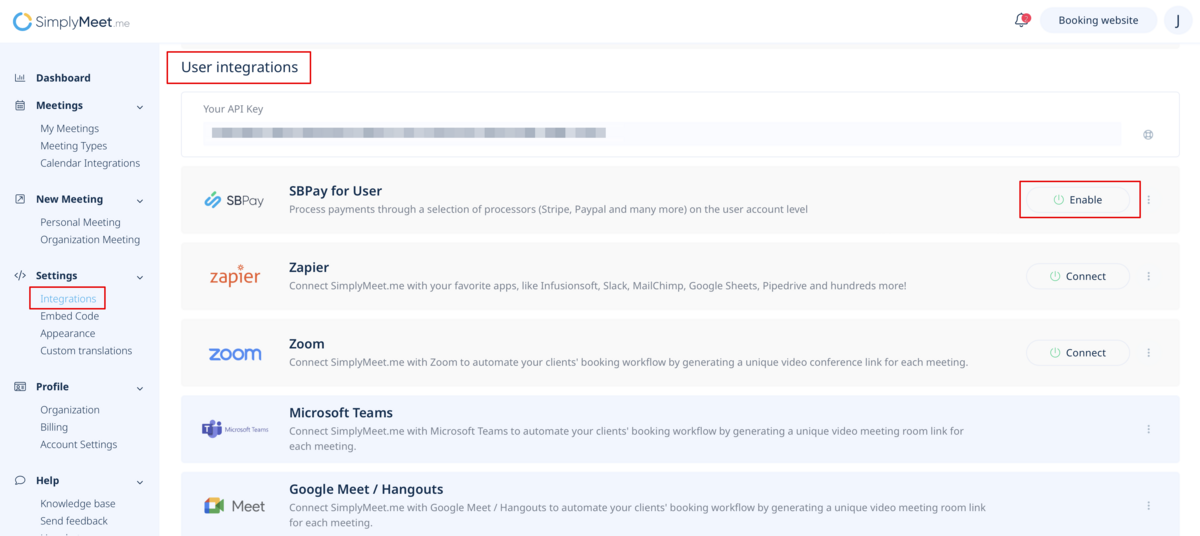
2. Click on '''Enable''' near '''SBPay for User''' if you plan to use it for the single account.</p> | |||
[[File:Sbpay enable for user.png|1200px|center|link=https://help.simplymeet.me/images/1/19/Sbpay_enable_for_user.png]] | |||
<br><br> | |||
<p>Or enable '''SBPay for Organisation'''* if you are an owner of the organization.</p> | |||
[[File:Sbpay for organization.png|1200px|center|link=https://help.simplymeet.me/images/e/e3/Sbpay_for_organization.png]] | |||
<br><br> | |||
<p> | |||
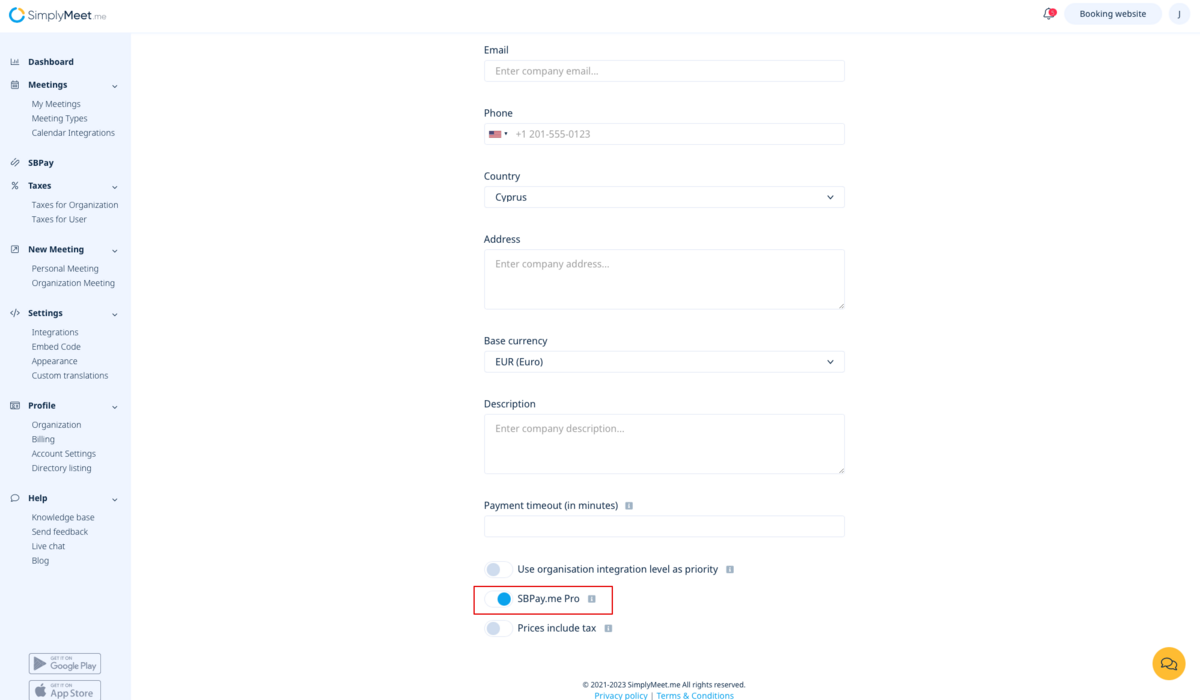
3. If you have paid subscription you can also enable '''PRO''' version(here on registration or later while editing the integration settings), that will open access to refunds and sending payments links from SBPay.me interface.</p> | |||
<p> | |||
So just fill in the form with your company details and hit '''Activate SBPay!''' button at the top.</p> | |||
<p> | |||
[[File:Enable sbpay pro on registration.png|1200px|center|link=https://help.simplymeet.me/images/b/b3/Enable_sbpay_pro_on_registration.png]]</p> | |||
<p> | |||
4. Go to the SBPay interface using the corresponding button and choose '''Payment processors''' tab.</p> | |||
<p> | |||
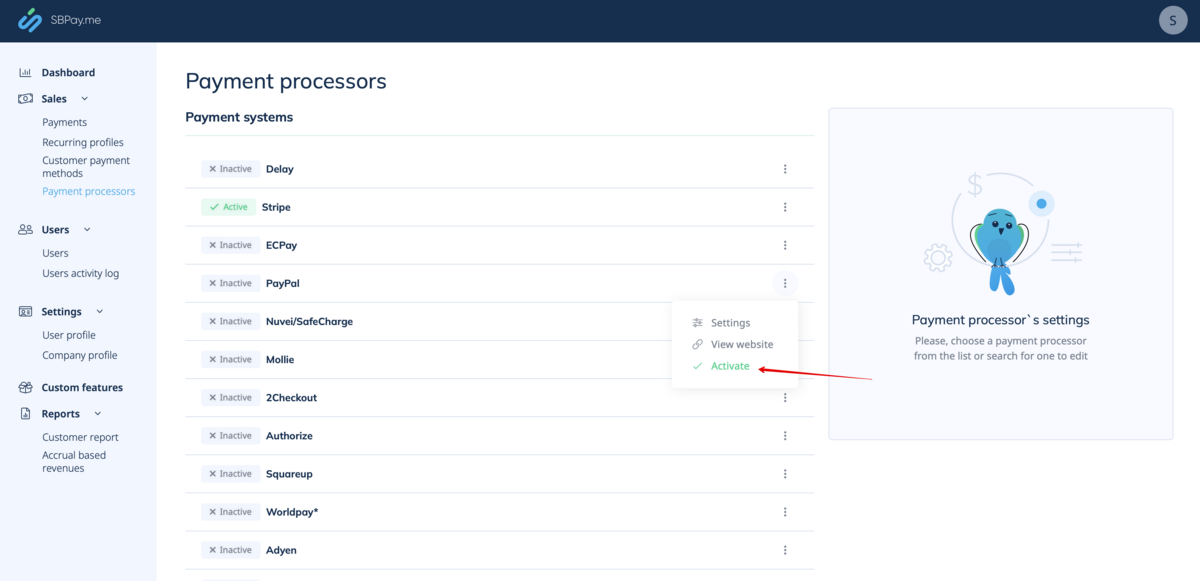
5. Click on the desired payment system name, select to '''Activate''' it.</p> | |||
[[File:Activate payment system.png|1200px|center|link=https://help.simplymeet.me/images/8/83/Activate_payment_system.png]] | |||
<br><br> | |||
<p> | |||
6. Add your credentials for the chosen payment system and save settings.</p> | |||
<p> | |||
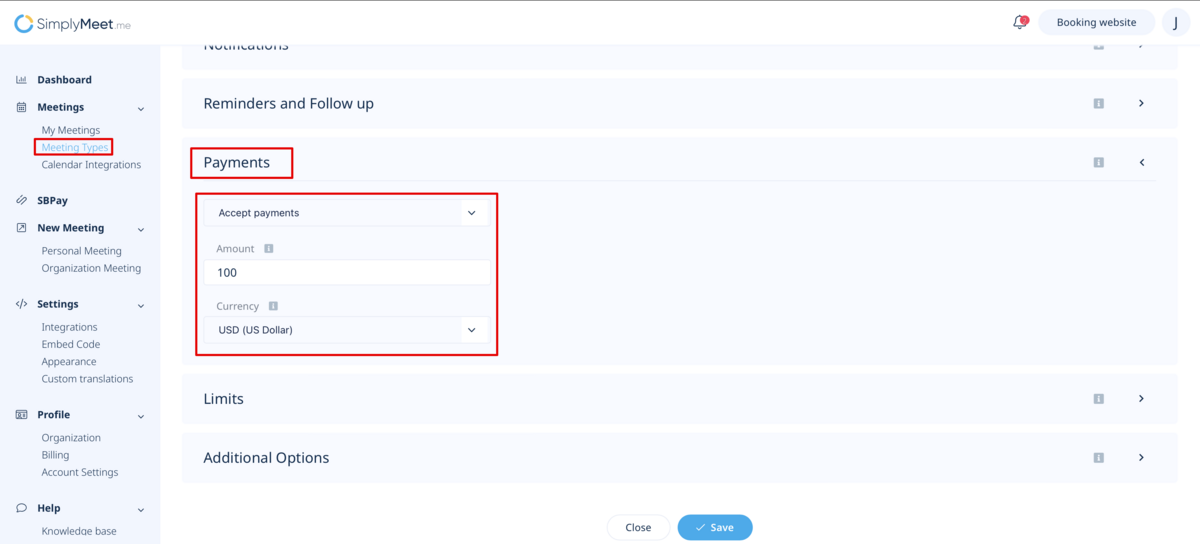
7. Get back to your SimplyMeet.me account and navigate to Meeting types page to add prices for the desired items there.</p> | |||
[[File:Set price for meeting type.png|1200px|center|link=https://help.simplymeet.me/images/a/a9/Set_price_for_meeting_type.png]] | |||
<br><br> | |||
<p> | |||
8. As long as everything is added and saved your customers will be able to make payments online to confirm their appointments.</p> | |||
<nowiki>*</nowiki>You can also have both levels enabled and decide whether to set organization level as a priority or not. | |||
[[File:Sbpay fpr organization as priority.png|1200px|center|link=https://help.simplymeet.me/images/1/1e/Sbpay_fpr_organization_as_priority.png]] | |||
<br><br> | |||
<p>'''Please note!''' If this option is "On" all the payments will be processed through organisation SBPay.me account.<br> | |||
If you disable it then each user integration will be used for payments. | |||
===Available reports in the SBPay.me system=== | |||
SBPay.me is quite a new system but already has several useful reports that you can use to track your payments:<br> | |||
Please check the details [https://help.simplybook.me/index.php/SBPay.me_integration#SBPay.me_Reports here] | |||
Latest revision as of 10:21, 24 December 2024
Collect payments from clients at time of booking with PayPal, Stripe, Adyen and many other processors via SBPay in just a few simple steps.
You can use the integration on the user account level as well as organization one (with paid subscriptions).
- How to set
1. Navigate to your Integrations page.
2. Click on Enable near SBPay for User if you plan to use it for the single account.

Or enable SBPay for Organisation* if you are an owner of the organization.

3. If you have paid subscription you can also enable PRO version(here on registration or later while editing the integration settings), that will open access to refunds and sending payments links from SBPay.me interface.
So just fill in the form with your company details and hit Activate SBPay! button at the top.

4. Go to the SBPay interface using the corresponding button and choose Payment processors tab.
5. Click on the desired payment system name, select to Activate it.

6. Add your credentials for the chosen payment system and save settings.
7. Get back to your SimplyMeet.me account and navigate to Meeting types page to add prices for the desired items there.

8. As long as everything is added and saved your customers will be able to make payments online to confirm their appointments.
*You can also have both levels enabled and decide whether to set organization level as a priority or not.

Please note! If this option is "On" all the payments will be processed through organisation SBPay.me account.
If you disable it then each user integration will be used for payments.
Available reports in the SBPay.me system
SBPay.me is quite a new system but already has several useful reports that you can use to track your payments:
Please check the details here